Version 4 - Last Updated: 31 Jul 2025
Learning Provider Portal user guide
A guide to support you using the Learning Provider Portal.
What is the Learning Provider Portal?
What is the Learning Provider Portal user guide for?
We provide an administration service in support of the Advanced Learner Loan. The Learning Provider Portal is the secure website where the service runs.
This user guide outlines the processes you should follow when you use the portal. It also covers its functions, help resources and general best practice rules.
How to access the Learning Provider Portal
How to access the Learning Provider Portal
You can access the portal through an internet browser. The portal supports Microsoft Edge and Chrome.
You should be able to use it with other browsers, but some pages may look a little different.
To go to the portal, select the Sign into the LP Portal button at the top of this page.
How to sign in to the Learning Provider Portal
The user administrator at your organisation will give you your username and initial password when they create your user account.
You must keep your user information safe. Never give your username or password to anyone else.
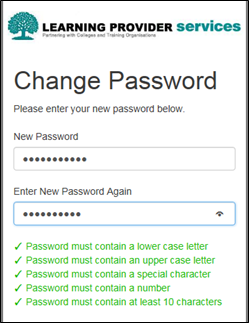
Signing in for the first time
When you first sign into the system, you'll need to create a new password. This helps to keep your account safe.
Enter your username and select Sign in. This will open the Change Password page. Follow the system prompts on this page to create your new password.
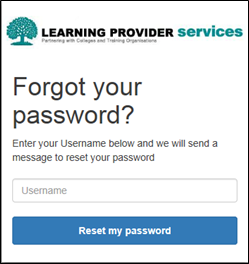
How to reset your password
If you enter your username or password incorrectly, the system will ask you to try again.
If you have forgotten your password, select the Forgot your password? link and enter your email address. You'll receive a message with a code and instructions to reset your password.
Security
You should always sign out of the system when you have finished. This helps to prevent unauthorised use of your account.
Select the Sign out link at the top of the page. This will take you back to the Sign In page. For security purposes, you should now close your browser.
If you forget to sign out, the portal will automatically end your session after 15 minutes of inactivity.
You must be vigilant about user access and keep usernames and passwords safe.
If someone leaves your organisation, your user administrator must expire their account. This helps to ensure the security of the portal and learner data.
See Expiring user accounts for more information about how to do this.
Learning provider user roles
Learning Provider User Administrator (LP User Administrator)
A user who can maintain other user accounts within their own user base. This includes adding new users and resetting passwords.
Learning Provider Administrator (LP Administrator)
A user who can view profile and contact information on the portal.
They can view basic and detailed learner information, perform searches, make field updates and export search results.
Learning Provider Advisor (LP Advisor)
A user who can view profile and contact information on the portal.
They can view basic and detailed learner information, perform searches and export search results.
Learning Provider Change of Circumstance Administrator (LP CoC Administrator)
A user who can create, view and import Change of Circumstance notifications (CoCs). They can also view CoC import results and create and view CoC submission reports.
Learning Provider Change of Circumstance Advisor (LP CoC Advisor)
A user who can view CoCs, CoC import results and CoC submission reports.
Learning Provider Financial Administrator (LP Financial Administrator)
A user who can access the Financials section of the portal.
They can create, view and export the loan position report.
They can view and export payment remittance files.
Attendance Administrator (LP Attendance Administrator)
A user who can view and export the attendance confirmation worklist and confirm attendance.
Using the Learning Provider Portal
Learning Provider Portal Home page
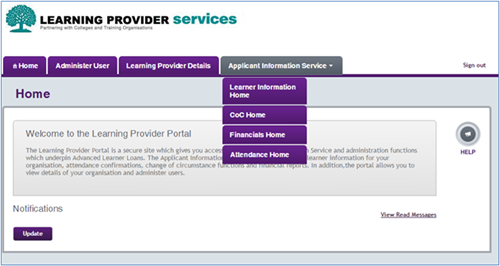
Once you've signed in, you'll automatically go to the Home page. You can navigate to all areas of the portal from here.
Messages and notifications
We'll sometimes add important messages and notifications to the Home page.
System maintenance schedules, news and other information will appear in the message area in the centre of the page:
Each message will show as a separate notification.
Priority
This field shows the importance of the message. This can be urgent, high, medium or low.
Subject
This field gives you a brief overview of the message content.
Read?
If this box is checked, you've read the message.
Update
This button lets you update the status of the message to read or unread.
Select Messages to view the popup notification.

Notifications will only show for a set period. When this time is up, you'll no longer see the notification whether you've read the message or not.
How to navigate the Learning Provider Portal
You can use the tabs on the Home page to navigate to all areas of the portal that you have access to.
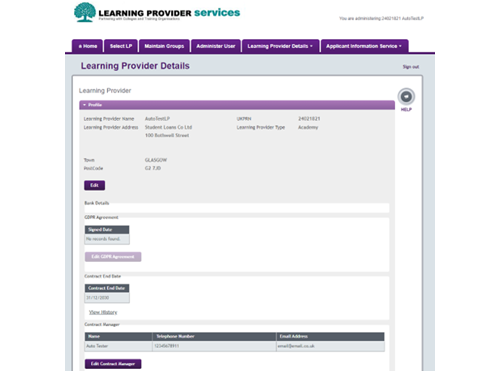
Learning provider profile
Learning provider profile
To view the profile of your organisation, go to the portal Home page and select the Learning Provider Details tab.
This tab will show the information the Department for Education (DfE) has given us for your organisation.
You should regularly check these details to ensure they are accurate and up to date.
When your new learning provider profile is created, your contract manager will get an email.
When your learning provider profile is updated, your users with Primary and Secondary Business Contact roles will get an email.

Updating provider details
If your organisation’s name or address changes, you should update your details on the UK Register of Learning Providers (UKRLP) website.
The correct details will then automatically carry through to the Department for Education (DfE). They will send the new details to us in a monthly update file. We receive the file on the second Tuesday of each month.
Updating contract manager details
If your contract manager’s name, telephone number or email address changes, you should update these on the UK Register of Learning Providers website
You should then also send an email with the correct information to loans.businessops@education.gov.uk and copy in your DfE Account Manager.
DfE will then manually update the details and send them to us in the monthly update file.
Updating bank details
If your bank details in the live system are incorrect, you should submit a completed BAN 1 Form and email it to DfE at dfe.standingdata@education.gov.uk.
DfE will then send these details to us in the monthly update file.
We get your bank account details from DfE, so the account on the Learning Provider Portal will always be the same as the account your DfE payments go into. These cannot be different.
Contract details
You can see your contract end date and history on the Learning Provider Details tab of the portal. If the contract end date is incorrect you should contact your DfE territory manager.
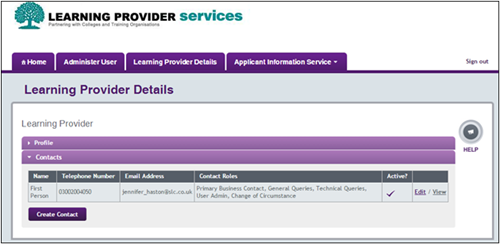
Learning provider contacts
Maintaining learning provider contacts
The Department for Education (DfE) gives us the details of your contract manager. We will then ask the contract manager to nominate a primary and secondary business contact.
It is important that these contact details are correct and up to date so we can contact you if we need to.
All portal users can view these contacts but only someone with User Administrator access can create and edit them.
Creating contacts
- Go to the portal Home page and select the Learning Provider Details tab.
- Select Contacts and then Create Contact.
- Enter the new contact details.
- Choose the contact roles from the list. Check a box to select a role or deselect it to remove the role.
- When you've finished, select Save.
All fields are mandatory. If you have entered something incorrectly or left fields blank, you may see an error message.
A portal user can be a primary business contact or a secondary business contact, but not both. They can have any number of other contact roles.
Editing contacts
- Go to the portal Home page and select the Learning Provider Details tab
- Select Contacts and then Edit.
- Overtype the existing details to add or change information.
- Check or uncheck the checkboxes to add or remove contact roles.
- Select Save to save your changes.
Making contacts inactive
If it is no longer necessary for a a user to continue their role as a contact, you should deactivate their record.
- Go to the portal Home page and select the Learning Provider Details tab.
- Select Contacts to open the Contacts view.
- Find the contact you want to make inactive and select Edit.
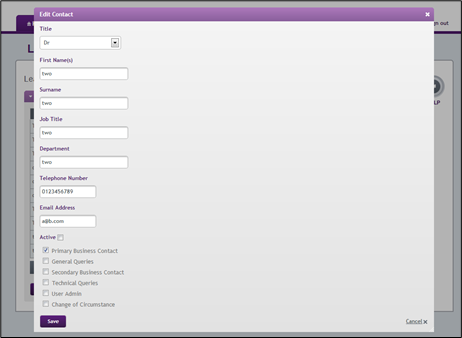
- Unselect the Active checkbox and then select Save. The contact is now inactive.
Administering system users
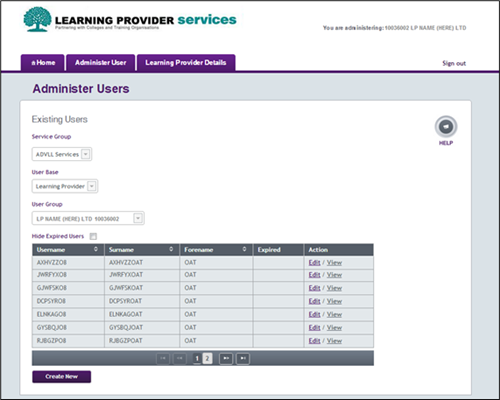
Administering system users
If you have User Administrator access, you can create and maintain users within your organisation.
Go to the portal Home page and select the Administer User tab.
This will take you to the list of users in your user group. The 'Hide Expired Users' checkbox will be populated, ensuring only Active users are displayed. You can still uncheck the box to display both Active and Inactive users. You can create new users and edit existing users from this page.
Creating new users
- Go to the portal Home page and select the Administer User tab.
- Select Create New. This will take you to the Create New User page.
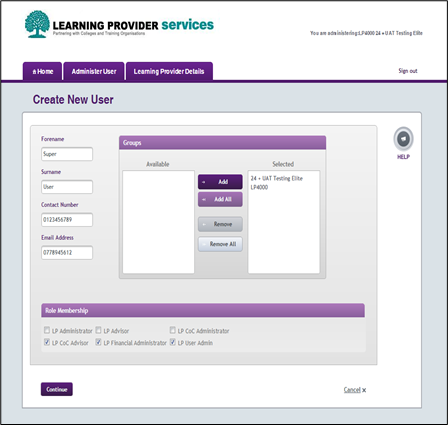
- Enter the new user’s details. All fields here are mandatory.
- Your organisation will appear in the Groups box. Select Add to select it.
- Select roles for the user from the Role Membership box. Check all roles that apply.
- Select Continue to create the user. This will take you to the Preview New User.
- Make sure the details you entered are correct and select Save.
Administering existing users
- Go to the portal Home page and select the Administer User page.
- Find the user account you want to update on the Administer User page and select Edit. If you have many existing users, you can arrange the list alphabetically by username, surname, or forename. To do this, select the relevant heading.
- Once you've found the user you need, select Edit.
- Overtype the fields you want to update, then select Continue. This will take you to the Edit User Authentication Details page.
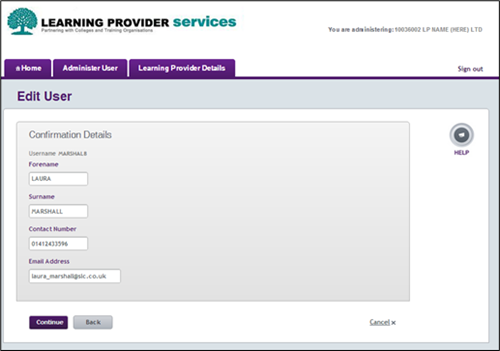
5. From the Edit User Authentication Details page, you can add or remove the user’s role memberships and reset or lock their password.
You cannot amend user details if the Expired checkbox is selected.
Expiring user accounts
You should expire an account if the user no longer needs access to the system. For example, they might have left their job or changed their role.
Once you've expired a user’s account, you cannot edit or reinstate it.
- Go to the portal Home page and select the Administer User tab.
- Find the user account you want to expire and select Edit.
- This will take you to the Confirmation Details page. Select Continue.

4. This will take you to the Edit User Authentication Details page. Select the Expire Account checkbox and select Continue.
5. On the next page, select Save to expire the user account.
Applicant Information Service
Overview
When a learner submits a loan application, the application details will appear on the Applicant Information Service (AIS).
You can use AIS to view, update and change application details. Depending on your user role, you may also be able to view financial reports here.
Detailed Learner Information
You can see learner applications in the Learner Information section of the portal.
You can view applications both before and after they're approved. Depending on your user role, you can:
- search and view application information
- use filter to search for one or more learners
- view detailed information for a learner
- view learner assessment history
- export learner information and assessment history
- update reference data fields
- view applications that have approved for the first time within a particular time frame
See Searching and viewing learner information for more information on this area of the portal.
Change of Circumstance Home
If you are a CoC user, you can make changes to application information if learners change their study plans.
For more information on how to make these changes, see Change of Circumstance notifications (CoCs).
You'll not be able to create a CoC unless a CoC contact exists. See Maintaining learning provider contacts for information about how to add and edit contacts.
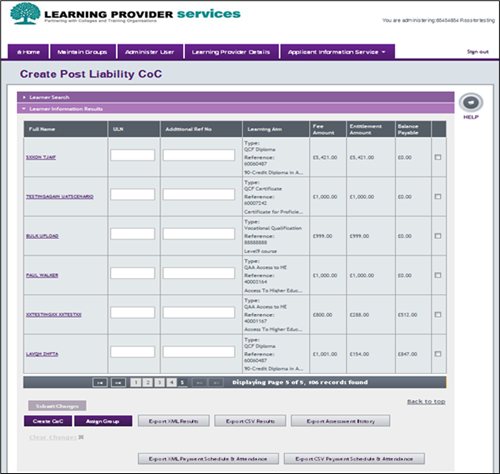
Searching and viewing learner information
Searching and viewing learner information
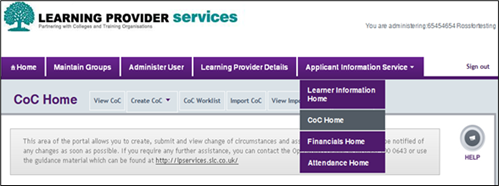
From the Home page, hover over the Applicant Information Service tab to open the menu, then select Learner Information Home.

The Learner Information page has 2 tabs you can search on: Learner Search and Learning Aim. It will always default to the Learner Search tab.
If you enter search criteria on one tab and then select another, any data you have entered will clear and you must start your search again.
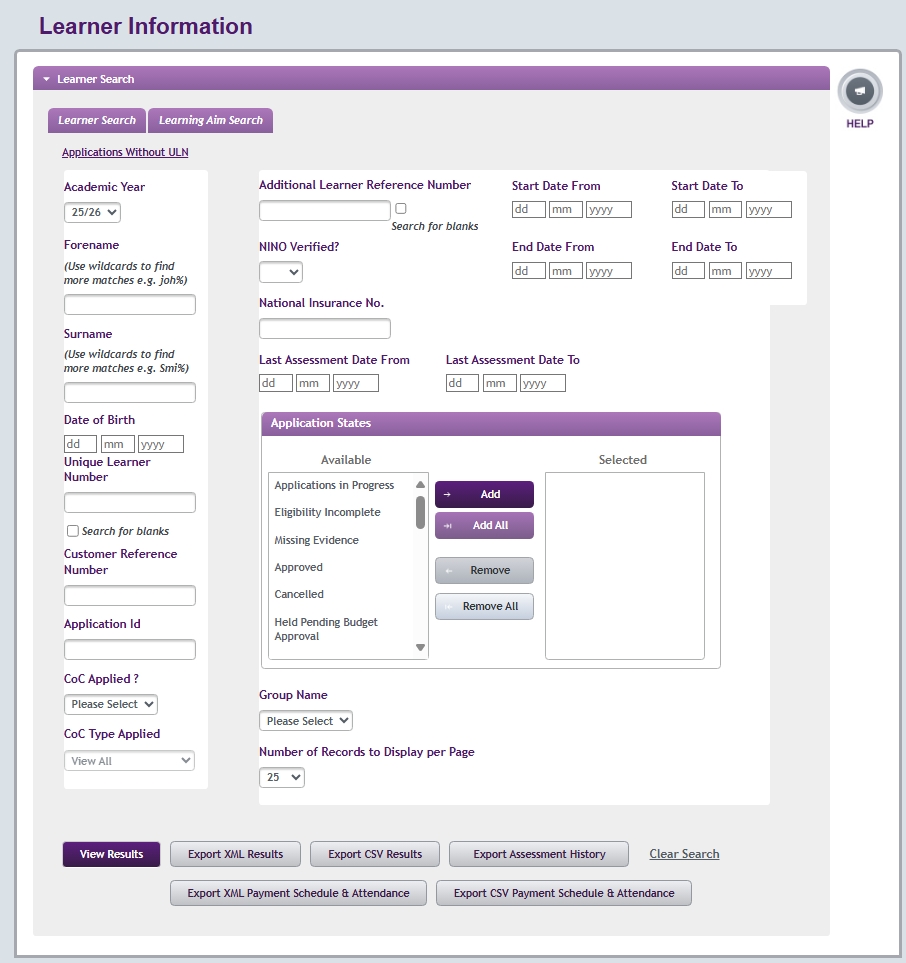
Learner search
If you have LP Administrator or LP Advisor access, you can search for learners on the Learner Search page from the Applicant Information tab. You can use the filters below:
Academic Year
The academic year refers to any year when the learner’s application is active. For example, if the learner begins a 3-year learning aim in November 2023, completing in May 2026, the search will return their details for 2023/24, 2024/25 and 2025/26. This is a mandatory field.
To change the academic year, select another year from the dropdown menu.
Forename
If you enter a forename, you must also enter a surname. A wildcard search will find more matches, but you must enter at least 3 characters, for example joh%.
Surname
If you enter a surname, you must also enter a forename. A wildcard search will find more matches, but you must enter at least 3 characters, for example joh%.
Date of Birth
The learner’s date of birth. The format must be DD/MM/YYYY.
Unique Learner Number (ULN)
You can search for a specific ULN or select the Search for blanks checkbox to search for learners without a ULN. Initially this field will be blank and you should enter a ULN for all your learners.
If you have learners without a ULN, you'll get the message ‘You have learners who do not currently have a ULN’ on the Learner Information page.
Customer Reference Number (CRN)
This is the main identifier we give to learners. They'll use this number when they apply for any SLC products or when they contact us. You do not need to validate this number. It is for your information only.
Additional Learner Reference Number (ALRN)
You can search for a specific reference or select the Search for blanks checkbox to search for learners without an ALRN. You can add your own ALRN for a learner. See how to do this in the Adding the Additional Learner Reference Number chapter.
Verified National Insurance number
This is a dropdown that lets you select Yes or No. If a learner does not have a verified National Insurance number, this will block loan payments. You can find more information in the Financials Home section of the Applicant Information Service.
Start Date From
If you enter a Start Date From, you must also enter a Start Date To. Use this to search for learning aims within a certain date range.
Start Date To
If you enter a Start Date To, you must also enter a Start Date From. Use this to search for learning aims within a certain date range.
End Date From
If you enter an End Date From, you must also enter an End Date To. Use this to search for learning aims within a certain date range.
End Date To
If you enter an End Date To, you must also enter an End Date From. Use this to search for learning aims within a certain date range.
Last Assessment Date From
If you enter a Last Assessment Date From, you must also enter a Last Assessment Date To. Use this to search for applications that have been assessed or reassessed within a certain date range.
Last Assessment Date To
If you enter a Last Assessment Date To, you must also enter a Last Assessment Date From. Use this to search for applications that have been assessed or reassessed within a certain date range.
Application Status
You can search for applications that are at the following work stages:
- approved
- application in progress
- eligibility incomplete
- missing evidence
- suspended
- cancelled
- withdrawn
- ineligible
- held pending budget approval
You can only see applications that learners have already submitted to us.
If you have a learner who has applied online and their details are not showing, they may not have submitted the application yet.
Number of Records to Display per Page
You can use this dropdown to change the number of records per page. The options are 25, 50, 100 or 200.
Group Name
You can search for learners assigned to individual groups. The groups will appear in the dropdown.
Please note - Users not assigned to a group will only be able to see applications that aren't assigned to a group.
CoC Applied?
Select Yes to search for learners who have had a Change of Circumstance (CoC) applied. Select No to search for learners who have not had a CoC applied. Use this together with the Last Assessment Date From field to search for applications within a certain date range.
CoC Type Applied
You can search for learners by CoC type:
- view all
- fee charged
- learning aim details
- loan requested
- learning provider
- cancel application
You'll need to select Yes from the Coc Applied? field to use this search option.
Learning aim search
You can view the Learning Aim Search from the Applicant Information Service tab. You can use the following filters within the Learning Aim Search to find one or more learners. You can use the filters below:
Academic Year
The academic year refers to any year when the learner’s application is active. For example, if the learner begins a 3-year learning aim in November 2023, completing in May 2026, the search will return their details for 2023/24, 2024/25 and 2025/26. This is a mandatory field.
To change the academic year, select another year from the dropdown menu.
Learning Aim
The name of the learning aim as provided by the Department for Education (DfE). A wildcard search will find more matches, but you must enter at least 3 characters, for example mat%.
Reference
The learning aim reference as provided by DfE. This reference number is 8 characters long.
Learning Aim Type
You can choose the learning aim type from the dropdown menu. The options are:
- A level
- A2 level
- AS level
- Advanced apprenticeship
- QAA Access to HE
- QCF certificate
- QCF diploma
- Vocational qualification
Start Date From
If you enter a Start Date From, you must also enter a Start Date To. Use this to search for learning aims within a certain date range.
Start Date To
If you enter a Start Date To, you must also enter a Start Date From. Use this to search for learning aims within a certain date range.
End Date From
If you enter an End Date From, you must also enter an End Date To. Use this to search for learning aims within a certain date range.
End Date To
If you enter an End Date To, you must also enter an End Date From. Use this to search for learning aims within a certain date range.
Course Trainer
You can search for a specific course trainer or select the Search for blanks checkbox to search for learners without a course trainer code. You can also use a wildcard search, but you must enter at least 3 characters, for example J15%. You can add your own course trainer codes for learners, see Field updates for how to do this.
Course Location
You can search for a specific course location or select the Search for blanks checkbox to search for learners without one. You can also use a wildcard search, but you must enter at least 3 characters, for example J15%. You can add your own course location codes for learners, see Field updates for how to do this.
Number of Records to Display per Page
You can use this dropdown to change the number of records per page. The options are 25, 50, 100 and 200.
Group Name
You can search for learners who have been assigned to individual groups. The groups will appear in the dropdown.
CoC Applied?
Select Yes to search for learners who have had a Change of Circumstance (CoC) applied. Select No to search for learners who have not had a CoC applied. Use this together with the Last Assessment Date From field to search for applications within a certain date range.
CoC Type Applied
You can search for learners by CoC type:
- view all
- fee charged
- learning aim details
- loan requested
- learning provider
- cancel application
You'll need to select Yes from the Coc Applied? field to use this search option.
How to search for learners
The Learner Information page will automatically default to the Learner Search tab. If you want to search based on learning aims, select the Learning Aim Search tab.
- Enter your search parameters.
- Depending on your access level (see Learning provider user roles for more information about this), you may be able do the following:
- view results
- export results as an xml file
- export results as a csv file
- export assessment history
- export payment schedule and attendance as an xml file
- export payment schedule and attendance as a csv file
- clear search
Select one of these actions to validate your search criteria. If the validation is successful, the system will show or export the results. If the validation is unsuccessful, you'll get an error message.
How to view your search results
Once you've entered your search parameters, select View Results to see the search results on screen.
The results will show information at a summary level. If you want more detailed information, select the Application number hyperlink. See View detailed learner information for more details.
The search results will be ordered alphabetically by surname, but you can change this by selecting another header.
You can see the total number of records the search has found below the search results.
You'll also be able to see the number of the page, along with the total number of pages the search has returned.
To view a different page of results:
- select the page number to view that page
- select the arrows to navigate through the pages
App State
Identifies the Application State of a learners application.
Entitlement Amount
This is the amount of loan the learner is eligible for.
We use the following information to calculate how much a learner is entitled to:
- the fee amount
- the maximum funding rate for the course
- the loan amount the learner has requested
We'll pay the lowest of the 3 amounts and this amount will be shown here.
Balance Payable
If the fee stated on the application is more than the loan the learner has requested or is entitled to, the balance payable will show here.
Exporting learner information
Exporting learner information
If you have LP Advisor or LP Administrator access, you can export learner information. You can do this directly from the search page or after viewing results on screen.
The exports are available in xml and csv format.
- Select one of the export result options.
- The Results Export section will appear at the bottom of the page. The system will ask you to enter a filename. This can be up to 50 characters long.
- Select Export Results and follow the on-screen prompts to choose where you want to save the file.
Validation when exporting data
You may get an error message if a file cannot be exported.
If a search returns more than 50,000 records, you'll get this error message:
'Too many records match the search criteria you have entered. Please use the criteria to further restrict the number of records returned.'
If no records match your filter parameters, you'll get this error message:
'No records match the criteria entered. Please amend your criteria and search again.'
View detailed learner information
View detailed learner information
After you've completed a search and viewed the summary results on screen, you can look at individual learner records for more detailed information.
The Detailed Learner Information page gives you more information about a learner’s application. If you are an LP Administrator, you can also update their ULN and other fields there.
If you have the Attendance Administrator role, you'll also be able to confirm a learner’s attendance from this page. See the Detailed Learner Information page confirmation for more information.
To view the Detailed Learner Information page, select the learner from the search results page.
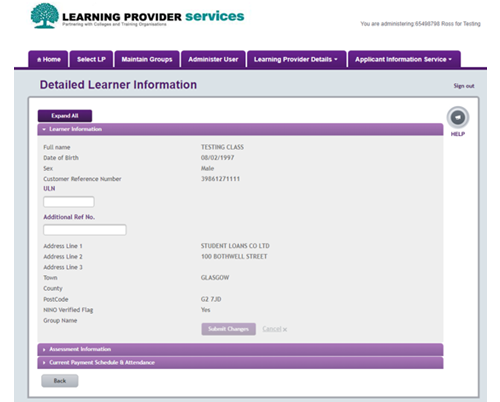
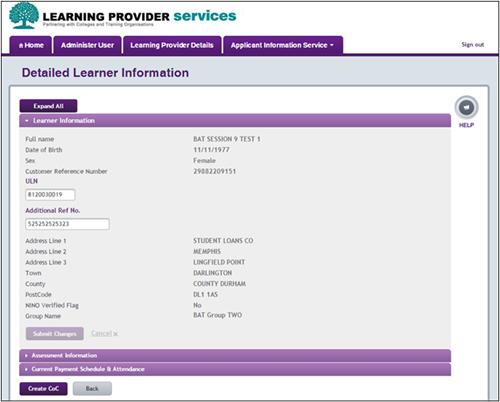
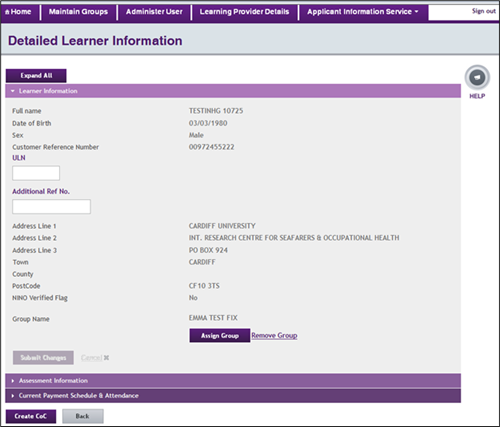
The Detailed Learner Information page is split into several sections.
Learner Information
This section has the learner's personal information.
Assessment Information
This section has details about current and historical assessments of the learner’s application.
Current Payment Schedule
This section has details of the learner’s loan payment schedule.
You can view all 3 sections at the same time if you select the Expand All button.
Learner information
You'll not be able to change most of the information in the Learner Information section.
The exceptions are the Unique Learner Number (ULN), Additional Learner Reference Number (ALRN) and Ground Name. See Field updates for more information on how to update these.
If the learner wants to amend any other personal information such as their address, they need to contact Student Finance England.
Assessment information
The Assessment Information section shows current and historical assessment information. This is split into:
- current application state, effective date and history
- current assessment
- assessment history
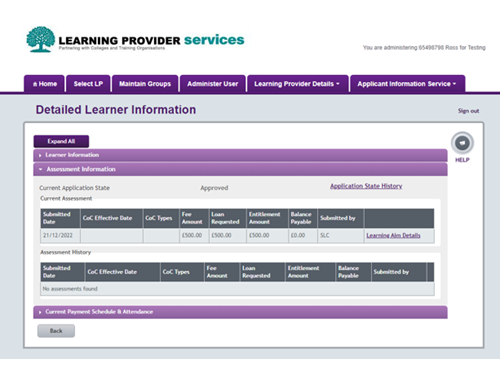
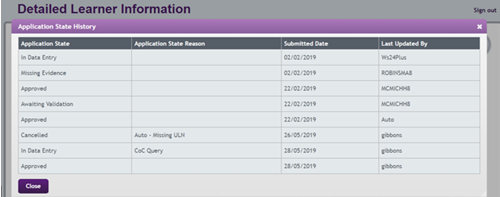
Current application state, effective date and history
Select the Application State History hyperlink to see the history of the selected application. This will open in a popup window.
Fields
Application State
Shows the application state.
Application State Reason
Shows the application state reason.
Submitted Date
Shows the date the application state is effective from.
Last Updated By
Shows the user who last updated the information.
Current assessment
The Current Assessment section shows details of the current assessment for the learner.
Fields
Submitted Date
This is the date the change was submitted, which resulted in the current assessment outcome.
CoC Effective Date
This is the effective date of the change.
Fee Amount
The fee the learner has stated on their application.
Loan Requested
The amount of loan the learner has requested.
Entitlement Amount
The amount of loan the learner is eligible for.
We use the following information to calculate how much loan a learner is entitled to:
- the fee amount
- the maximum funding rate for the course
- the loan amount the learner has requested
We'll pay the lowest of the 3 amounts and this amount will be shown here.
Balance Payable
If the fee stated on the application is more than the loan the learner has requested or is entitled to, the balance payable will show here.
Submitted By
If you've submitted a CoC to generate the current assessment, this will show the username of the person who submitted that CoC.
If the assessment was generated from another source this will show 'SLC' or 'Learner'.
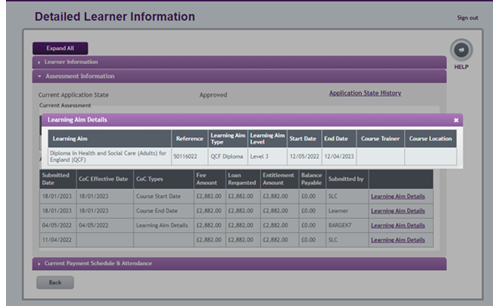
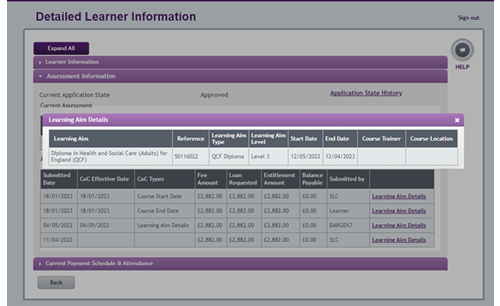
Learning Aim Details
A hyperlink that opens a popup with more information about the current learning aim.
Learning Aim
The learning aim as provided by the Department for Education (DfE).
Reference
The learning aim reference as provided by DfE.
Learning Aim Type
Type of qualification.
Learning Aim Level
Level of qualification.
Start date
Learning aim start date.
End date
Learning aim end date.
Course Trainer
Course trainer if provided.
Course Location
Course location if provided.
Assessment history
The Assessment History section shows historical assessment information for the learner.
Fields
Submitted Date
The date the change was submitted, resulting in the current assessment outcome.
CoC Types
This is the effective date of the change.
Fee Amount
The fee charged by the provider that is associated with the historical assessment.
Loan Amount Requested
The amount of loan the learner requested that is associated with the historical assessment.
Entitlement Amount
The amount of loan the learner was eligible for that is associated with the historical assessment.
We use the following information to calculate how much loan a learner is entitled to:
- the fee amount
- the maximum funding rate for the course
- the loan amount the learner has requested
We'll pay the lowest of the 3 amounts.
Balance Payable
The difference between the fee amount and the entitlement amount associated with the historical assessment.
Submitted By
If a CoC was submitted to generate the historical assessment, this will show the username of the person who submitted that CoC.
On initial assessment, if a CoC was not submitted and the application was made online, this will show ‘Learner’.
On initial assessment, if a CoC was not submitted and the application was made on paper, this will say ‘SLC’.
Current payment schedule & attendance
The Current Payment Schedule & Attendance section shows the loan payment schedule for an individual learner.
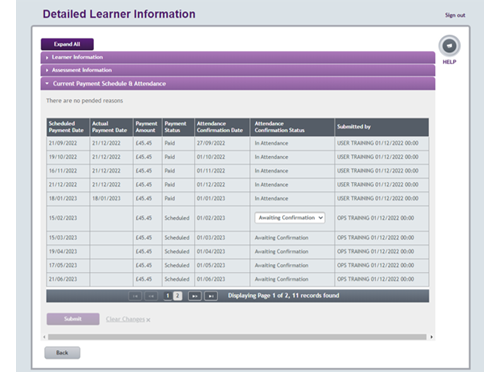
Fields
Scheduled Payment Date
The date when the instalment has been scheduled for payment.
Actual Payment Date
The date the payment was made to your organisation.
Payment Amount
The amount that will be or has already paid to your organisation.
Payment Status
The status of the payment:
- scheduled
- in progress
- paid
Attendance Confirmation Date
The date you should confirm attendance by.
Attendance Confirmation Status
Attendance confirmation status:
- awaiting confirmation
- in attendance
- not in attendance
- change start date
Submitted By
Details of the user who submitted the attendance confirmation.
We can only make a payment when:
- we have verified the learner’s National Insurance number
- you have entered a ULN for the learner
- you have confirmed the learner’s attendance
You can also export the current payment schedule and attendance report for several learners in csv or xml format.
You can see the 2 export options on the Learner Search and Learner Information Results pages:
- export xml payment schedule and attendance
- export csv payment schedule and attendance
The csv file contains the following headings:
- learner surname
- learner forename
- learner date of birth
- learner NINO verified
- Unique Learner Number
- Additional Learner Reference Number
- Customer Reference Number
- Learning Aim description
- Course trainer
- Provider group
- scheduled payment date
- actual payment date
- payment amount
- payment status
- payment pended reason
- attendance confirmation date
- attendance confirmation status
- submitted by
- application ID
The csv file has one row for each scheduled payment, so you'll have multiple rows for most learners. The data is ordered alphabetically by learner surname.
Details of the xml export are defined in the Current Payment Schedule and Attendance Export Schema. If you need a copy please email lp_services@slc.co.uk.
Field updates
Updating fields from the Learner Information Results page
LP Administrators can update the following learner references for single or multiple learners in one submission from the Learner Information Results page:
- Unique Learner Number (ULN)
- Additional Learner Reference Number (ALRN)
See Adding the Unique Learner Number (ULN) for guidance on how to search and upload data for missing ULNs.
See Adding the Additional Learner Reference Number for guidance on how to search and upload data for missing ALRNs.
You need LP Administrator access to update fields on a learner’s application.
Unique Learner Number (ULN)
The ULN is mandatory information you must enter before you can confirm attendance. You can add it on an individual learner record, to multiple learners at once or by bulk import. It must be numeric and must be 10 characters long.
Additional Learner Reference Number
This is an optional field where you can add your own reference number for the learner. You can add it on an individual learner record or to multiple learners. It can include both letters and numbers and be up to 20 characters long.
Course Trainer Code
This is an optional field that you can add to a learner’s application. It can include letters, numbers and ampersands and be up to 8 characters long.
Course Location Code
This is an optional field you can add to a learner’s application to segment learners at different locations or campuses. You can add this for individual learners. It can include letters, numbers and ampersands and be up to 8 characters long.
Adding the Unique Learner Number (ULN)
The Unique Learner Number (ULN) is a mandatory field. You need to add it before you can confirm a learner’s attendance.
You can add the ULN to single or multiple learner records in one transaction.
If you have learner records without a ULN, you'll see a message that says, ‘You have learners who currently do not have a ULN’.
- Go to the Learner Search page and select the academic year from the Academic Year dropdown.
- Select the academic year from the Academic Year dropdown.
- Select the Search for blanks checkbox next to the Unique Learner Number field.
- Select View results to see the results on screen.
- Enter ULNs to one or more of the search results.
- Select Submit changes to make the updates effective immediately. Alternatively, select Clear Changes to clear any ULNs you have entered but not submitted.
Adding the Additional Learner Reference Number (ALRN)
The Additional Learner Reference Number (ALRN) is an optional field. You can use it to add your own reference numbers to learners. You can add the ULN to single or multiple records in one transaction.
- Go to the Learner Search page and select the academic year from the Academic Year dropdown.
- Select the Search for blanks checkbox next to the Additional Learner Reference Number field.
- Select View Results.
- Add the ALRN to one or more of the search results.
- Select Submit changes to make the updates effective immediately. Alternatively, select Clear changes to clear any ALRNs you have entered but not submitted.
Field updates from the Detailed Learner Information page
If you have LP Administrators access, you can update some fields on a learner's application from the Detailed Learner Information page. You can do this for individual learners only. The fields you can update are:
- Unique Learner Number (ULN)
- Additional Learner Reference Number (ALRN)
- course trainer code
- course location code
Adding the Unique Learner Number (ULN) to individual learner records
- Go to the Application Information Service dropdown and select Learner Information home.
- Go to the Detailed Learner Information page and enter the ULN in the ULN field.
- Select Submit changes.
- Select Back to exit the page.
If you select Cancel, instead of Submit changes, this will cancel any changes and take you back to the original information on the Learning Aim Details popup.
If you started from a search results page, you'll see the results and search criteria when you return to that page.
Unique Learner Number (ULN) validation
To validate the ULN, the system will:
- check the ULN is in the correct format
- check the ULN does not belong to another learner record
If the system finds that the ULN is correct and unique, it will save the updates. The page will refresh and show the updated information.
If the system finds that the ULN format is incorrect, it will not save the updates. The ULN will be removed from the page and you'll get the following message:
‘The ULN is in the incorrect format, please update this and submit changes.’
If the system finds that the ULN format is correct but it is not unique, it will not save the updates. The ULN will be removed from the page and you'll get the following message:
‘The ULN is not unique, please update this and submit changes.’
If you submit ULNs for multiple learners, the system will update all that pass validation.
To find which updates failed validation, search for records with blank ULNs.
When you add ULNs from a page of search results, the changes can only be added for one page at a time. You must submit them before you move on to the next page. If you try to move to another page without selecting Submit changes you'll get the following message:
‘Please submit your changes before continuing.’
Adding Additional Learner Reference Numbers to individual learner records
- Go to the Application Information Service dropdown and select Learner Information home.
- Search for a learner and select the Detailed Learner Information page.
- Enter the additional reference number in the Additional Ref No field.
- Select Submit changes.
- Select Back to exit the page.
If you select Cancel instead of Submit changes, this will cancel any changes and take you back to the original information on the Learning Aim Details popup.
If you started from a search results page, you'll see the results and search criteria when you return to that page.
Additional Learner Reference Number validation
The system will check that the Additional Learner Reference Number (ALRN) does not exceed the maximum length.
If the system finds that the Additional Learner Reference Number is in the correct format, it will save the updates. The page will refresh and show the updated information.
If the system finds that the Additional Learner Reference Number format is incorrect, it will not save the updates. The number will be removed from the page and you'll get the following message:
‘The Additional Learner Reference Number is in the incorrect format, please update this and submit changes.’
If you submit Additional Learner Reference Numbers for multiple learners, the system will update all that pass validation. To find which updates failed validation, search for records with blanks.
When you add Additional Learner Reference Numbers from a page of search results, the changes can only be added for one page at a time. You must submit them before you move on to the next page. If you try to move to another page without selecting Submit Changes you'll get the following message:
‘Please submit your changes before continuing.’
Adding course trainer and course location codes to individual learner records
Adding the course trainer code and course location code is optional. You can use these to differentiate learners at different campuses or sites.
- Go to the Application Information Service dropdown and select Learner Information home.
- Search for a learner and select the Detailed Learner Information page.
- Select Assessment Information.
- Select Learning Aim Details. This will open a popup.
5. Add the course trainer and course location codes and select Submit Changes. This will take you back to Assessment Information.
6. Select Back to exit.
If you started from a search results page, you'll see the results and search criteria when you return to that page.
Course trainer and course location code validation
The system will check that the course trainer code does not exceed the maximum length of 3 years.
If the course trainer code is in the correct format, the system will save your update. The page will refresh and show the updated information.
If the course trainer code is in the incorrect format, it will not save your the update. It will remove your code from the page and you'll get the following message:
‘The Course Trainer is in the incorrect format, please update this and submit changes.’
The system will check that the course location code does not exceed the maximum length of 3 years.
If the course location code is in the correct format, it will save your update. The page will refresh and show the updated information.
If the course location code is in the incorrect format, it will not save your update. The code will be removed from the page and you'll get the following message:
‘The Course Location is in the incorrect format, please update this and submit changes.’
Field updates by bulk import
Adding ULNs by bulk import
If you have LP Administrator access, you can import ULNs for multiple learners using a bulk import file. This file must be in xml or csv format. For example, you can bulk upload attendance confirmations and Change of Circumstance notifications (CoCs).
If you are using a csv file, the report you want to import should be in the following format.
|
Header number |
Header name |
Example |
|
Header 1 |
learnerSurname |
Smith |
|
Header 2 |
learnerForename |
John |
|
Header 3 |
learnerDateOfBirth |
1984-05-10 |
|
Header 4 |
customerReferenceNumber |
12345678912 |
|
Header 5 |
uniqueLearnerReferenceNumber |
5412541444 |
We recommend you export the learner information from the Learning Provider Portal first, using the csv format. You can then update the exported file (for example remove additional columns) and save it to your own system. This will give you a file to work with that is in the correct format and has the necessary information.
When you open a csv file in Excel, Excel will try to remove zeroes from the start of numbers.
One way to prevent this is to import the csv file in a specific way.
- Open a blank Excel sheet.
- Select all cells (CTRL+a) and format them as text (right click and select Format cells).
- Open your csv file in Notepad. An easy way to do this is to drag the file into an open Notepad window.
- Copy all the content of the csv file and paste it into the first cell in Excel. Notice that a Paste options icon appears somewhere on screen.
- Select the small arrow next to that icon, then select Use text import wizard. This will open a wizard.
- Make sure Delimited is selected, then select Next.
- Select Comma and deselect Space in the delimiters area. Then select Next.
- You'll now need to define how to treat each column. We do not want Excel to change anything, so we'll define them all as text. Select the first column in the sheet, scroll sideways all the way to the right and shift+select the last column. In Column data format, select Text.
- Select Finish.
Follow the steps below to add ULNs in bulk.
- Sign into the Learning Provider Portal.
- On the portal Home page hover over the Applicant Information Service tab to open the menu, then select Learner Information Home.
3. On the Learner Information Home page, open the Import menu.
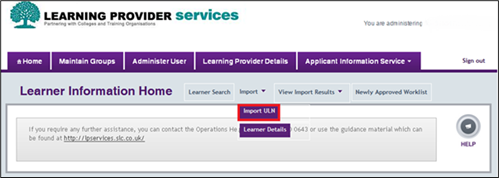
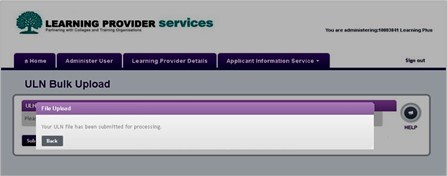
4. Select Import ULN. This will open the ULN Bulk Upload page.
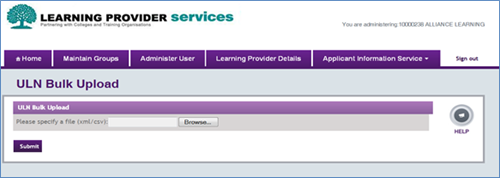
5. Select Browse and follow the on-screen prompts to choose the ULN file you want to import.
6. When you have selected the file, select Submit to upload it. The system will then confirm that the ULN file has been submitted for processing.
When you submit the file, the system will check that the file is in the correct format. The format must be the same as detailed in the schema. All the mandatory fields must be filled. The system will also check that the file follows the correct business rules.
The system will process each ULN as in individual record. It'll then show the validation results to confirm which records passed and which failed validation. See Viewing ULN bulk import results for more information.
ULN bulk import validation rules and errors
The system checks the content of imported ULN files to ensure the data is correct and meets both format and business rules, such as:
- the file contains all expected fields in the correct order
- the file contains at least one record
- the ULN is not blank
- the ULN does not already exist
If a single record within a file fails format validation this will not cause the entire file to fail.
Once the system has successfully validated the file, it will update the learner applications with the new ULNs.
You can find more details of the file format validation rules in the Technical Proposal. This is part of the Technical Specifications for the Learning Provider Portal. If you need a copy, please email lpservices@slc.co.uk.
Viewing ULN bulk import results
The Learning Provider Portal validates imported ULN data when you submit it, before applying it to learner applications. You can view details of the imported data and the submission results on the portal.
This lets you:
- track the number of ULNs you have submitted for learners
- track the progress of ULN submissions
- see where the original file is stored
- see who submitted the file
- check for any errors
You'll need LP Administrator access view the import results.
- Sign into the Learning Provider Portal
- From the portal Home page, hover over the Applicant Information Service tab to open the menu, then select Learner Information Home.
- Select View Import Results/ULN Details. This will open the View ULN Import Result page.
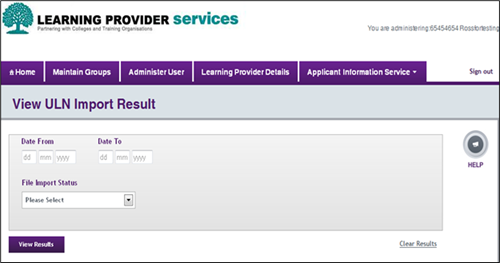
4. Enter the start and end date range to search for, select an option from the File Import Status dropdown and select View Results. The results will appear below the search fields.
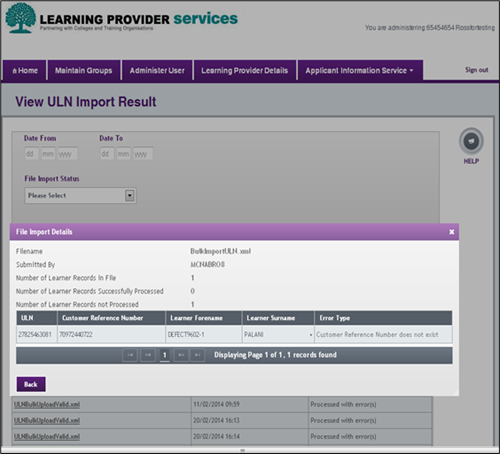
5. Select the filename of the record you want to look at to view import results.
Any records which have not been processed will be arranged by ULN by default. You can arrange them by other filter headings if you prefer.
For details of error messages, see the Technical Specifications. If you need a copy please email lp_services@slc.co.uk.
Adding Additional Learner Reference Numbers, course trainer codes and course location codes by bulk import
You can bulk import csv or xml files with the following details:
- course trainer
- course location
- Additional Learner Reference Number
The information in this upload is specific to the application rather than the learner. Therefore, the import file needs to include an application ID for the import to work.
To get the application ID, you should export learner information from the Learning Provider Portal. You can export this in xml or csv format.
- Open a blank Excel sheet.
- Select all cells (CTRL+a) and format them as text (right click and select Format cells).
- Open your csv file in Notepad. An easy way to do this is to drag the file into an open Notepad window.
- Copy all the content of the csv file and paste it into the first cell in Excel. Notice that a Paste options icon appears somewhere on screen.
- Select the small arrow next to that icon, then select Use text import wizard. This will open a wizard.
- Make sure Delimited is selected, then select Next.
- Select Comma and deselect Space in the delimiters area. Then select Next.
- You'll now need to define how to treat each column. We do not want Excel to change anything, so we'll define them all as text. Select the first column in the sheet, scroll sideways all the way to the right and shift+select the last column. In Column data format, select Text.
- Select Finish.
You can then update the exported file (for example remove additional columns) and save it to your own system. For the import, the csv file must be in the following format.
|
Header number |
Header name |
Example |
|
Header 1 |
learnerSurname |
Smith |
|
Header 2 |
learnerForename |
John |
|
Header 3 |
learnerDateOfBirth |
1984-05-10 |
|
Header 4 |
uniqueLearnerReferenceNumber |
5412541444 |
|
Header 5 |
applicationId |
1251 |
|
Header 6 |
additionalLearnerReferenceNumber |
123 |
|
Header 7 |
courseLocation |
North |
|
Header 8 |
courseTrainer |
53544 |
You can find full information on the formats of the csv and xml files in the Schema Definition and Technical Specification documents. Please email lp_services@slc.co.uk if you need copies of these.
To import the file, follow the steps below.
- Select the Learner Information Home tab.
- Hover over Import to open the menu and select Learner Details.
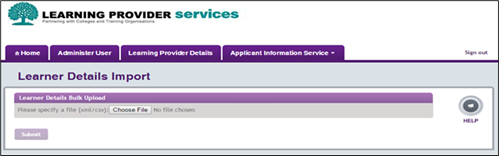
- Select Browse and choose the xml or csv file from your own system. Then select Submit. The system will confirm that the file has been submitted for processing.
To view the import status of the file, return to the Learner Information Home page. Select View Import Results and Learner Details. See Viewing ULN bulk import results for further information.
Viewing the Newly Approved Worklist
- Go to the Applicant Information Service menu.
- Select Learner Information Home.
- On the Learner Information Home page, select the Newly Approved Worklist link.

The Newly Approved Worklist page shows applications that have been approved for the first time, within a particular timeframe.
Select an option from the Time Frame dropdown, then select Display Worklist to see the results.
The timeframes you can select are:
- less than a day
- less than a week
- less than a fortnight
- less than a month
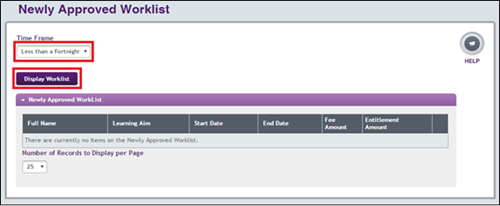
The worklist will show all applications that meet the criteria you have selected.
Once you've selected the worklist, select the Full Name link to see detailed information about the learner. Select Back on the Detailed Learner Information page to return to the worklist.
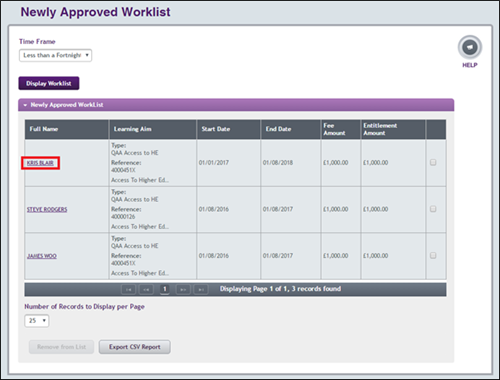
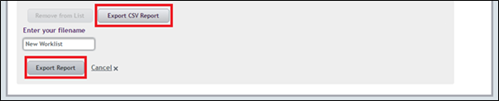
You can also export the worklist in csv format. To do this, select Export CSV Report, enter your filename and select Export Report.
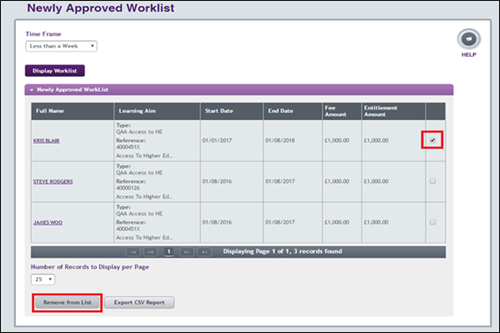
If you've taken the necessary action with an application and do not want it to appear on the Newly Approved Worklist, you can remove it from the list. To do this, select the checkbox in the last column, then select Remove from List.
This will remove the application from the worklist and future searches.
Viewing the Newly Submitted Worklist
- Go to the Applicant Information Service menu.
- Select Learner Information Home.
- In the Learner Information Home page, select the Newly Submitted Worklist link.

The Newly Submitted Worklist page shows applications recently submitted but are not yet Approved, within a particular timeframe.
Select an option from the Time Frame dropdown, then select Display Worklist to see the results.
The timeframes you can select are:
- less than a day
- less than a week
- less than a fortnight
- less than a month

The worklist will show all applications that meet the criteria you have selected.
Please note that the application will need to have a start date and end date to determine the academic year. It will also need to be at any of the below work stages to be displayed:
- In Data Entry
- Awaiting Validation
- Eligibility Incomplete
- Missing Evidence
- Awaiting Approval
Once you've selected the worklist, select the Full Name link to see detailed information about the learner. Select Back on the Detailed Learner Information page to return to the worklist

Change of Circumstance notifications (CoCs)
Change of Circumstance notifications (CoCs)
Sometimes a learner’s circumstances change and the information on their application is no longer accurate. If this happens, we need know about it as soon as possible. This will help us to ensure that payments are correct and to avoid overpayments.
We will accept Change of Circumstance notifications (CoCs) from:
- the learner directly
- the learning provider on behalf of the learner
Once a CoC is submitted, we'll process it automatically.
If you have LP Advisor or LP Administrator access, you can view the learner’s current and previous assessments on the Learning Provider Portal.
Change of Circumstance user roles
Only users with the following roles can access the CoC area of the Learning Provider Portal:
- Learning Provider Change of Circumstance Administrator
- Learning Provider Change of Circumstance Advisor
See Learning provider user roles for more information about these roles.
The Learning Provider Portal will not let you create a CoC unless a CoC contact already exists. It is important you keep your contact information up to date.
See Maintaining learning provider contacts for how to add and edit your contact information.
Pre-liability CoC – application status
A learner’s application is in the pre-liability stage until you submit a positive attendance confirmation to us.
An application becomes visible on the Learning Provider Portal as soon as the learner submits it to us.
You'll not be able to create a CoC until we have fully assessed and approved the application.
The system knows whether an application is pre- or post-liability and will only show available options.
You can create a pre-liability CoC for a learner whose application is at one of these application statuses:
- approved
- ineligible – you can submit a CoC when the application status is ineligible following a previous CoC
- cancelled – you can submit a Reinstatement CoC when the application status is cancelled following a previous cancellation CoC
The types of CoCs that will make a learner’s application ineligible are:
- decrease course fee
- decrease loan amount to less than £300
If the loan amount is reduced to £0, you'll not be able to submit a CoC to increase the loan amount. You’ll be able to submit other changes, but the learner will remain ineligible until they contact us to increase the loan from £0.
Post-liability CoCs – application status
A learner’s application is in the post-liability stage when you have submitted a positive attendance confirmation to us.
The types of CoC you can submit at this stage are different from those you can submit at the pre-liability stage.
The system will know whether an application is pre- or post-liability and will only show the available options.
You can submit post-liability CoCs for learners whose applications are at one of the following statuses:
- approved
- ineligible – you can submit a CoC when the application status is ineligible following a previous CoC
- suspended – you can submit a Reinstatement CoC when the application status is suspended following a previous Suspension CoC
Creating pre- and post-liability CoCs
You can create CoCs for:
- a single learner with a single change
- a single learner with multiple changes
- multiple learners with a single change
- multiple learners with multiple changes
If there is no CoC contact in the system, the Create CoC option will be disabled. See Maintaining learning provider contacts for information on how to add and edit contacts.
You can use several sections of the portal to create CoCs:
- Detailed Learner Information page – after selecting a learner on the Learner Information Home page
- CoC Search – on the CoC Home page
- CoC Worklist – on the CoC Home page
- Bulk Import – on the CoC Home page
Creating pre-liability CoCs from the Detailed Learner Information page
If you have LP CoC Administrator access, you can create CoCs for a single learner from the Detailed Learner Information page.
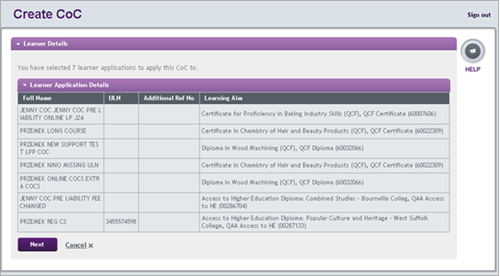
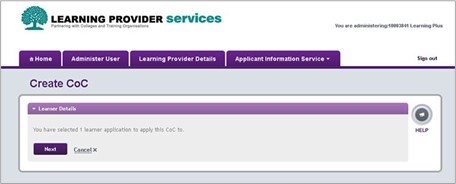
- Select Create CoC to open the Create CoC page. This will confirm the learners you have selected for the CoC.
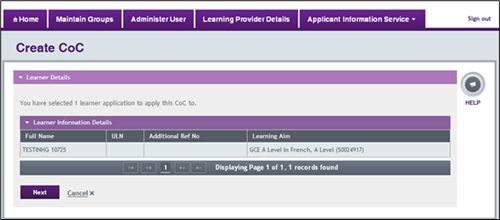
- Select Next to view the CoC options.
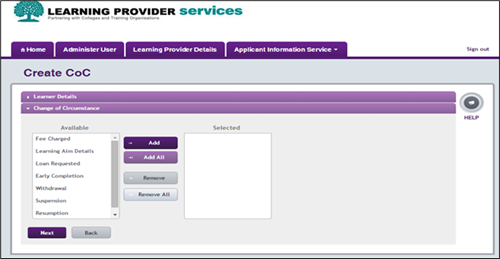
- Select the CoC type you need from the Available box then select Add. Then select Next.
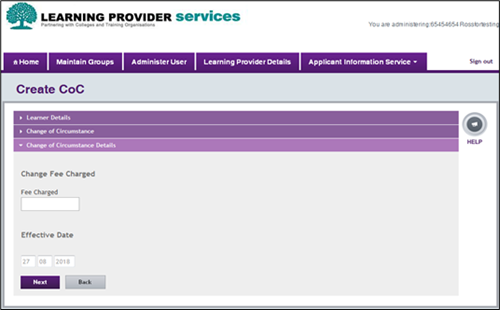
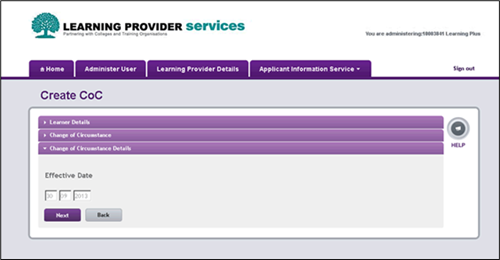
- Enter the effective date for the change. This cannot be a date in the future.
- Select the radio button for the appropriate CoC contact. This will be someone at your organisation we can contact about the CoC if we need to.
If you do not have an active CoC contact in the system, the Create CoC option will be disabled.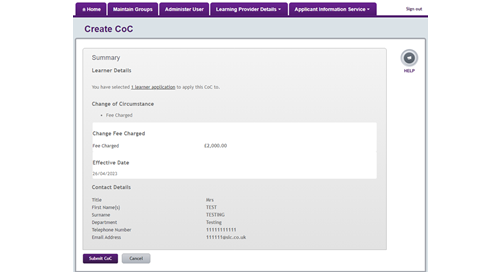
- Select Next to open the CoC Summary page.
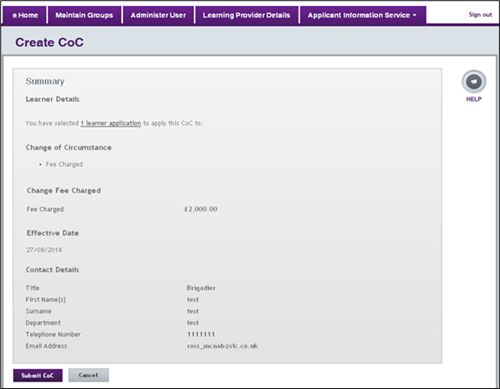
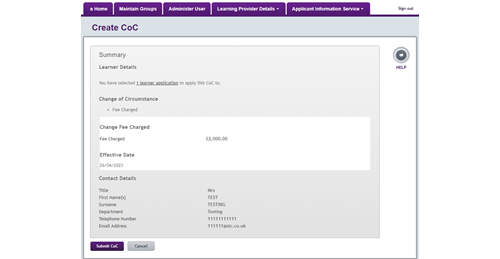
- Check the CoC details. If they are correct, select Submit. If they are incorrect, select Cancel to amend or cancel the CoC.
The system will check if a learner’s application has changed since you started creating the CoC. If another user has signed in and made a change at the same time, the system will not process the CoC and you'll get an error message.
Creating pre-liability CoCs from the CoC Home page
If you have LP CoC Administrator access, you can create CoCs from the CoC Home page.
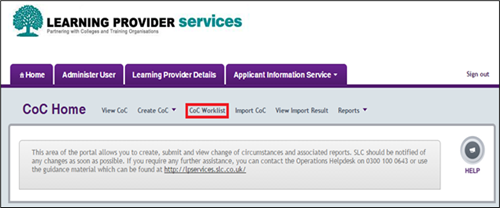
Hover over the Applicant Information Service tab to open the menu, then select CoC Home.
This will open the CoC Home page. You can navigate to all CoC options from this page.
If you start from the CoC Home page, you'll be able to submit CoCs for a single learner, or for multiple learners in one submission.
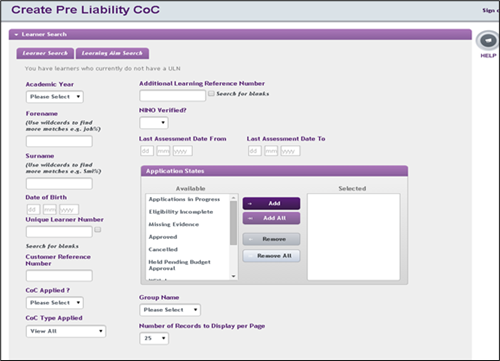
- Select Create CoC Pre Liability. This will open the Learner Search tab by default. If you want to search for learners by common learning aim, select the Learning Aim Search tab instead.
- Enter your search criteria and select View Results.
- Use the checkboxes to select the learners you need, then select Create CoC. This will open the Create CoC page.
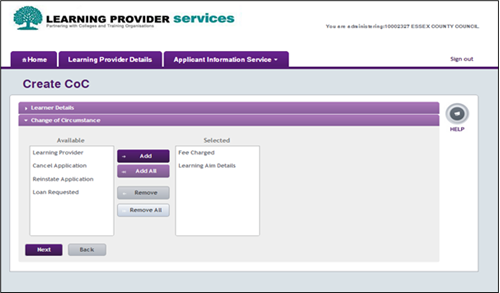
- Select Next, then select the CoC types you need from the Available box. Select Add and select Next again.
- This will open the Change of Circumstances Details page. Enter the details of the change and select Next.
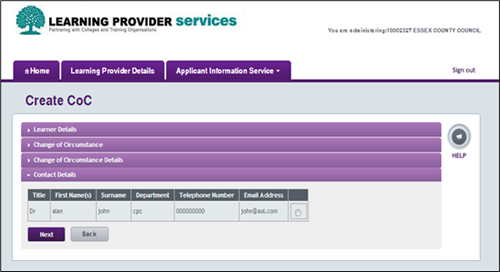
- This will open the Contact Details page. Use the radio buttons to assign a contact for the CoC. This will be someone at your organisation we can contact about the CoC if we need too. If you do not have an active CoC contact in the system, the Create CoC option will be disabled.
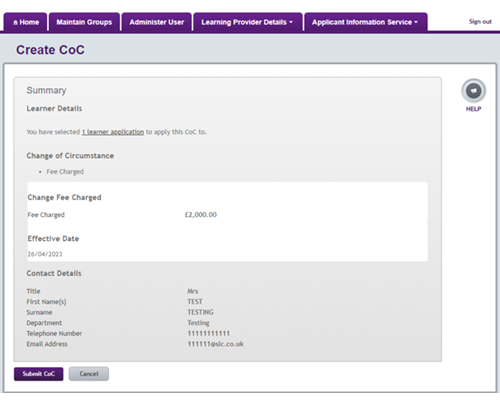
- Select Next to open the CoC Summary page.

- Check the CoC details on the summary page. If they are correct, select Submit. If they are incorrect, select Cancel to amend or cancel the CoC.
The system will check if a learner’s application has changed since you started creating the CoC. If another user has signed in and made a change at the same time, the system will not process the CoC and you'll get an error message.
Pre-liability CoC types
There are 6 types of CoCs you can use to tell us about a change to a learner’s application at the pre-liability stage.
|
CoC type |
Applied with other changes? |
Applied to multiple learners? |
What information do we capture for the change? |
Pre-liability, post-liability or both? |
|
Fee Charged |
Y |
Y |
learning aim fee effective date |
both |
|
Decrease Loan Amount |
Y |
N |
decrease loan loan amount required effective date |
both |
|
Learning Aim |
Y |
Y |
learning aim start date end date course trainer course location effective date |
both but with restrictions post-liability |
|
Learning Provider |
N |
Y |
learning provider effective date |
pre-liability |
|
Cancellation |
N |
Y |
effective date |
pre-liability |
|
Reinstate |
N |
Y |
effective date |
pre-liability |
Fee Charged CoC
You may need to use this CoC when a learner has changed their learning aim or has entered the incorrect fee on their application form.
- Go to the Change of Circumstance tab and select the Fee Charged CoC.
- Enter the new fee amount. The fee format is £00000.00. It can gave up to 13 digits before and 2 digits after the decimal point.
- Select Next to complete the CoC details and submit the CoC.
Decrease Loan Amount CoC
You may need to use this CoC if the learner has asked to decrease the amount of loan to fund their course and wants to self-fund the remainder. You can only apply the Decrease Loan Amount CoC to one learner at a time. The requested loan amount cannot be greater than the learner’s current entitlement amount.
- Go to the Change of Circumstance tab and select the Decrease Loan Amount CoC.
- Select the Yes or No radio button as needed.
- If you selected Yes, enter the required loan amount. The fee format is £00000.00 with a maximum of 13 digits before and 2 digits after the decimal point. The requested loan amount cannot be greater than the learner’s current entitlement amount.
- If you selected No, you cannot submit the CoC. You cannot increase the loan amount on the Learning Provider Portal. Only the learner can increase their loan amount through the Customer Portal.
- Select Next to complete the CoC details and submit the CoC.
Learning Aim CoC
You may need to use this CoC if a learner decides to undertake a different learning aim, or you need to update their start or end date.
You can only update the start date while the application is at the pre-liability stage.
The fields this CoC can capture are:
- learning aim
- start date
- end date
- course trainer
- course location
- effective date
These CoC fields are optional. You can enter information in one or more of them, depending on what is changing.
- Go to the Change of Circumstance tab and select the Learning Aim Details CoC.
- Enter the learning aim title. The system will search for possible matches across all learning aims.
- Enter the start date. The date format is dd/mm/yyyy.
The start date cannot be before the course start year.
The start date must be before the end date.
- Enter the end date. The date format is dd/mm/yyyy.
The end date must be after the start date.
When you change the end date, we'll update the payment schedule so it matches the new end date. For example, if the end date is now earlier, the payment schedule will be shorter. If the end date is now later, the payment schedule will be longer.
- Enter the course trainer code. This can include numbers and letters and have up to 8 characters.
- Enter the course location code. This can include numbers and letters and have up to 8 characters.
- Select Next to complete the CoC details and submit the CoC.
Learning Provider CoC
You may need to use this CoC if a learner wants to undertake a learning aim with a different provider. You cannot submit this CoC with any other CoCs.
We do not expect you to tell us every time a learner changes provider. We expect the learner to manage this information.
- Go to the Change of Circumstance tab and select the Learning Provider CoC.
- Enter the new learning provider name. The system will search for possible matches across all learning providers.
- Select the correct learning provider from the search results.
- Select Next to complete the CoC details and submit the CoC.
Cancel CoC
You may need to use this CoC if a learner no longer needs a loan to fund their course or decides not to attend the course at all. You cannot submit this CoC with any other CoCs.
- Go to the Change of Circumstance tab and select the Cancel CoC.
- Enter the effective date of the cancellation. The date format is dd/mm/yyyy.
- Select Next to complete the CoC details and submit the CoC.
Reinstate CoC
You may need to use this CoC if a learner who has previously cancelled decides to use their entitlement to fund their course. You cannot submit this CoC with any other CoCs.
- Go to the Change of Circumstance tab and select the Reinstate CoC.
You cannot reinstate an application if the original cancellation date is over 60 days from the reinstatement attempt. If you try to do this, the reinstatement will fail. - Enter the effective date of the reinstatement. The date format is dd/mm/yyyy.
- Select Next to complete the CoC details and submit the CoC.
Creating post-liability CoCs from the Detailed Learner Information page
If you have LP CoC Administrator access, you can create CoCs for a single learner from the Detailed Learner Information page.
- Select Create CoC. This will open the Create CoC page which confirms the learner you've selected for the CoC.
- Select Next to open the Change of Circumstance page. Choose the CoCs you need from the Available box, then select Add.
- Select Next. This will open the CoC Details page.
- Enter the effective date for the changes and select Next. This will take you to the CoC Contacts page.
- Select the appropriate contact with a radio button, then select Next. This will be someone at your organisation we can contact about the CoC if we need to.
- Select Next. This will take you to the CoC Summary page.
- Check the CoC details. If they are correct, select Submit CoC. If they are incorrect, select Cancel to amend or cancel the CoC.
The system will check if a learner’s application has changed since you started creating the CoC. If another user has signed in and made a change at the same time, the system will not process the CoC and you'll get an error message.
Creating post-liability CoCs from the CoC Home page
If you have LP CoC Administrator access, you can create CoCs from the CoC Home page.
Hover over the Applicant Information Service tab to open the menu, then select CoC Home.
This will open the CoC Home page. You can navigate to all CoC options from this page. If you start from the CoC Home page, you can submit CoCs for a single learner, or for multiple learners at once.
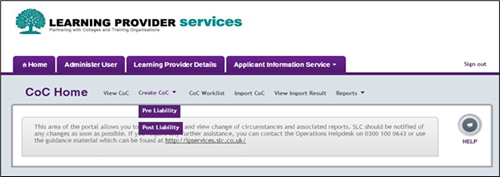
- Select Create CoC and Post Liability. The Learner Search page will open by default. If you want to search for learners by common learning aim, select the Learning Aim Search tab instead.
- Enter your search criteria and select View Results.
- Select the checkboxes for the learners you want to submit CoCs for. Select Create CoC to open the Create CoC page, then select Next.
- Select the CoC type from the Available box and select Add to add it to the Selected box.
- Enter the details of the change and select Next. This will open the CoC Details page.
- This will take you to the Contact Details page. Select the appropriate radio button to assign a contact for the CoC, then select Next. This will be someone at your organisation we can contact about the CoC if we need to.
- Select Next to open the CoC Summary page.
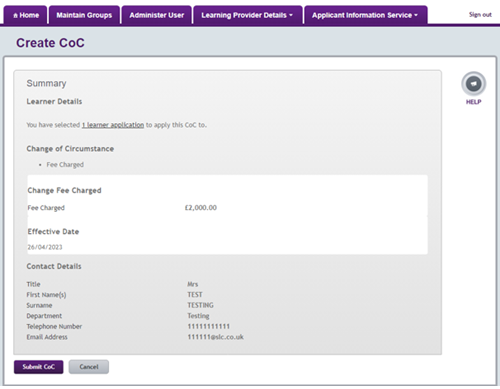
- Check the CoC details. If they're correct, select Submit. If they're incorrect, select Cancel to amend or cancel the CoC.
The system will check if a learner’s application has changed since you started creating the CoC. If another user has signed in and made a change at the same time, the system will not process the CoC and you'll get an error message.
Post-liability CoC types
There are 7 types of CoCs you can use to tell us about a change to an application at the post-liability stage.
|
CoC type |
Applied with other changes? |
Applied to multiple learners? |
What do we capture for the change? |
Pre-liability, post-liability or both? |
|
Fee Charged |
N |
Y |
learning aim fee effective date |
both |
|
Decrease Loan Amount |
Y |
N |
decrease loan loan amount required effective date |
both |
|
Learning Aim |
Y |
N – pre-liability only |
learning aim end date course trainer course location effective date |
both but with restrictions post-liability. The course must be the same level and type, unless there’s a transfer to one of the following types of learning aim:
The LP Portal will allow a transfer from a QCF Certificate or a QCF Diploma to a vocational qualification and a QCF Certificate to a QCF Diploma. |
|
Early Completion |
N |
N |
early completion date |
post-liability only |
|
Suspension |
N |
N |
effective date |
post-liability only |
|
Resumption |
Y – with the exception of the CoC types Withdrawal, Suspension or Early Completion |
N |
effective date |
post-liability only |
|
Withdrawal |
Y – Only with a Loan Amount or Fee Charged CoC |
N |
effective date |
post-liability only |
Loan liability is directly linked to the duration of attendance. You should therefore not reduce the course fee when a learner withdraws, unless you decide to charge no fees at all.
The Learning Provider Portal and our Operations Portal will use the effective date of the withdrawal to calculate how much loan is due. If you do want to reduce the course fee to less than the calculated amount, please contact your FE account manager.
Early Completion CoC
You'll need to use this CoC when a learner completes a learning aim early. You'll be entitled to the full fee if a learner successfully completes their learning aim before the expected end date.
- Go to the Change of Circumstance tab and select the Early Completion CoC.
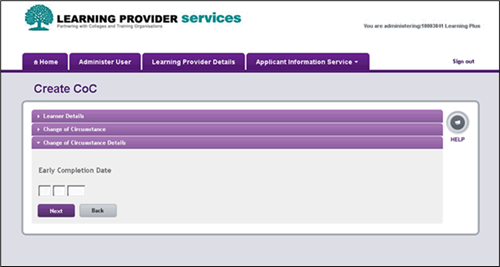
- Enter the last day of learning in the Early Completion Date field.
- Select Next to complete the CoC details and submit the CoC.
An Early Completion CoC will trigger all outstanding payments. We'll make these the month after you submit the CoC.
Suspension CoC
You'll need to use this CoC when a learner temporarily leaves the learning aim but intends to return within 12 months.
- Go to the Change of Circumstance tab and select the Suspension CoC.
- Enter the effective date of the suspension.
- Select Next to complete the CoC details and submit the CoC.
You'll only receive fee payments for learners who are in attendance. Payments will stop after a suspension but will start again once the learner resumes their study.
Resumption CoC
You'll need to use this CoC when a learner returns to learning after a temporary break in learning.
- Go to the Change of Circumstance tab and select the Resumption CoC.
- Enter the effective date when the learner resumed their studies.
- Select Next to complete the CoC details and submit the CoC.
You‘re able to change the Course End Date field if you need to when submitting this CoC. It will default to the current Course End Date if you do not need the option to change it.
You can only use the Resumption CoC if the learner’s current application status is suspended. After you submit a Resumption CoC, payments will begin for the learner.
The learner becomes liable for the loan after one or more days of attendance that month. You'll need to confirm the learner’s attendance in the month that they resume their learning aim. This applies even if the normal quarterly attendance check is not due yet. We'll add the learner to your Attendance Worklist when we need this confirmation.
Withdrawal CoC
You'll need to use this CoC when a learner leaves the learning aim. This could be because they are:
- transferring to another aim outside of what policy will allow
- changing learning provider
- leaving learning altogether
Loan liability is directly linked to the duration of attendance. You should therefore not reduce the course fee when a learner withdraws, unless you decide to charge no fees at all.
The Learning Provider Portal and our Operations Portal will use the effective date of the withdrawal to calculate how much loan is due. If you do want to reduce the course fee to less than the calculated loan, please contact your FE account manager.
- Go to the Change of Circumstance tab and select the Withdrawal CoC.
- Enter the effective date of the withdrawal.
- Select Next to complete the CoC details and submit the CoC.
You'll only receive fee payments for learners who are in attendance. Payments will stop after a withdrawal.
Creating pre- and post-liability CoCs from the CoC Worklist
You'll need CoC Administrator access to use the CoC Worklist.
Learners will appear on your CoC worklist after you've confirmed attendance. See Attendance for more information on how to do this.
Not all learners who've had an attendance confirmation will appear on the CoC Worklist. It depends on:
- the type of attendance confirmation (initial or subsequent)
- the attendance reason (change in start date or not in attendance)
Initial attendance confirmation: change of start date
When you confirm a learner’s attendance for the first time, you can select change of start date as the reason. These learners will still be classed as pre-liability.
If you submit this status, the system will automatically create a CoC reminder in your CoC worklist. You should create a Learning Aim Details CoC. The learner then will reappear on the worklist at the appropriate time.
Subsequent attendance confirmation: not in attendance
When you confirm a learner’s attendance on one of the subsequent quarterly returns, you can select not in attendance as the reason. These learners will be classed as post-liability.
The system will automatically create a CoC reminder in your CoC Worklist. You should create the appropriate CoC to either withdraw or suspend the learner.
As an exception to this rule, you should not submit an attendance confirmation if the learner is not in attendance because they completed their learning aim early.
In this case, you should complete an Early Completion CoC instead. This will update the learner’s information and remove them from the Attendance Confirmation Worklist.
How to create CoCs from the CoC Worklist
- On the Home page, hover over the Applicant Information Service tab. This will open the menu. Select CoC Home.
- On the CoC Home page, select CoC Worklist.
- The Attendance Confirmation Status column of the worklist shows the previous confirmation for the learner. This dictates whether the application is pre- or post-liability.
When you select the learners to create a CoC for, the system will not let you continue if you've selected a mixture of pre-liability and post-liability applications.
All learners whose attendance confirmation status is Change Start Date will be pre-liability.
All learners whose attendance confirmation status is Not in Attendance will be post-liability.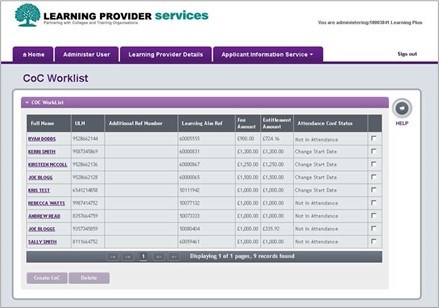
- To delete learners you do not want on the worklist, select the checkbox in the final column and select Delete.
- To select learners for a CoC, select the checkboxes in the final column, then select Create CoC. This will open the Create CoC page.
- Select Next and follow the system prompts to submit the CoC.
The changes you can make depend on the liability status of the learners.
If the learner’s attendance confirmation status was Change Start Date, they are at the pre-liability stage. You'll therefore need to submit a Learning Aim Details CoC to change their start date. See Pre-liability CoC types for more information on how to make this change.
If the learner’s attendance confirmation status was Not in Attendance, they are at the post-liability stage. You'll therefore need to submit a withdrawal or suspension. See Post-liability CoC types for more information about how to make these changes.
Creating CoCs by bulk import
If you have LP CoC Administrator access, you can import and submit CoC data in bulk. You can use csv and xml files for up to 500 learners for an academic year.
The file must be in a specified csv or xml format. You'll be able to upload it from your own file system.
This file can have a mixture of pre-liability and post-liability changes.
-
- Start by hovering over the Applicant Information Service tab on the poral Home page. This will open the menu.
- Select CoC Home. This will take you to the CoC Home page. You can navigate to all CoC options from this page.
- Select Import CoCs. This will open the CoC Bulk Upload page.
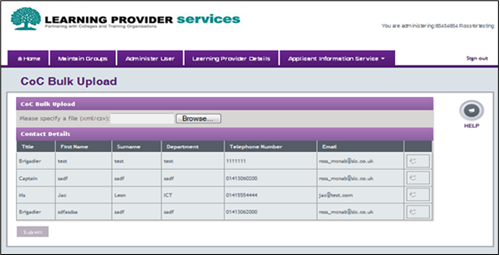
- Select Browse and follow the system prompts to select the file you want to upload.
- Select a radio button to assign a contact to the CoC. This will be someone at your organisation we can contact about the CoC if we need to.
- Select Submit. This will take you to the upload summary.
- Select Back to return to the CoC Home page.
- Start by hovering over the Applicant Information Service tab on the poral Home page. This will open the menu.
The system will validate the format of the submitted file and confirm which entries passed and which failed.
You'll get an itemised list of any failed CoC submissions. You can then can amend the file and upload it again, if you need to.
CoC validation rules and errors
The system checks the content of imported CoC files. This is to ensure the data is correct and meets both format and business rules, such as:
- the file contains all expected fields in the correct order
- the file contains at least one record
If a single record within a file fails format validation, this will not cause the entire file to fail.
Once the system has successfully validated the file, the learner’s application will be reassessed. We'll send the learner an updated entitlement letter to confirm their application status.
You can find more details of the file format validation rules in the Technical Proposal. This is part of the Technical Specifications for the Learning Provider Portal. If you need a copy, please email lpservices@slc.co.uk.
Viewing CoC bulk import results
You can view file submission results and details of imported CoC data on the Learning Provider Portal.
This lets you:
- track the number of CoCs submitted for learners
- track their progress
- see where the original file is stored
- see who submitted the file
- check for any errors
You'll need LP Administrator access to view the import results.
- Go to the CoC Home page and select View Import Results.
- Enter the start and end date range to search for.
- Select File Import Status and then View Results. The results will appear below the search area.

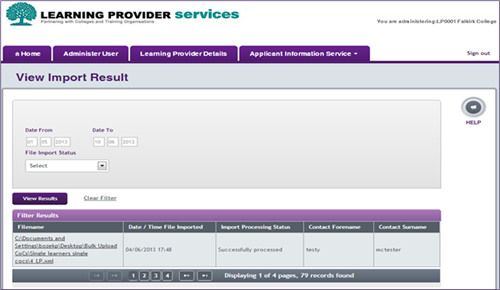
- Select the name of the file you want to view.
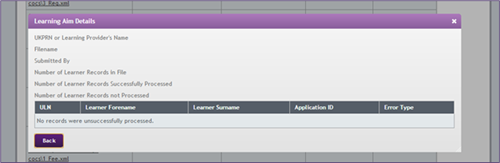
Any records that have not been processed will be arranged by ULN by default. You can arrange learner records by other filter headings if you prefer.
For details of error messages, see the Technical Specifications. If you need a copy please email lp_services@slc.co.uk.
You can then correct any failed records and import them back into the system.
CoC search
You'll need LP CoC Advisor or Administrator access to search submitted CoCs.
- Go to the CoC Home page and select View CoCs.
- Enter your search criteria and select View Results or Export Results.
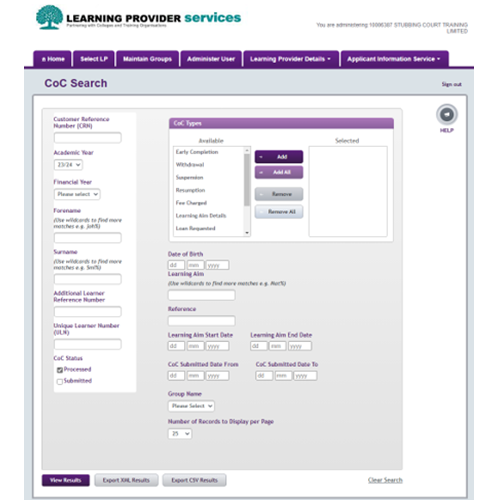
- If you selected View Results, the results will appear below the search area. Select the hyperlink on the learner's name, to see the CoC Summary page.
- If you selected Export Results, the CoC Results Export option will appear below the search area. Enter a filename for the export and select Export Results. The file will automatically download.
Requesting a submissions report
- On the portal Home page, hover over the Applicant Information Service tab. This will open a menu, then select CoC Home.
- Select Reports, then Submissions Report.
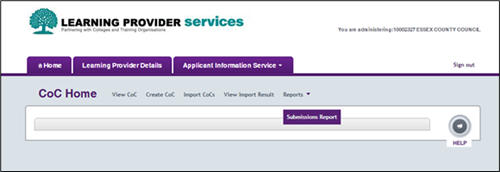
- Enter the CoC Submitted From and CoC Submitted To. The date format must be dd/mm/yyyy. These fields default to today’s date. Neither data can be in the future.
- Select the year from the Academic Year or Financial Year dropdown. The format is yy/yy in descending order. You must enter either an academic year or a financial year, but not both.
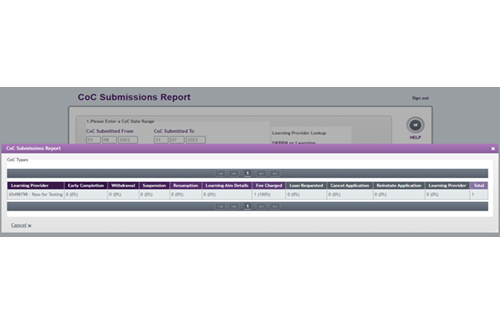
The report contains:
- the number of CoCs in each category
- the total number of CoCs
- the percentage that each category represents of the total
Financial reports
Financial Reports
The Financial Reports section of the Reports tab allows you to view or export your:
- remittance report
- loan facility details
- payment instalment report
You can view this information and export reports if you have Financial Administrator access.
For more information on financial reporting, see Financial Reports.
Accessing the financial area of the Applicant Information Service
You need to have LP Financials Administrator access to see the financial area of the Learning Provider Portal.
See Learning provider user roles for more information.
To begin, hover over the Reports tab on the portal Home page. This will open a dropdown menu, then select Financial Reports.
This will open the Financial Reports page. You can navigate to all financial reporting options from this page.

Payment instalment learner details reports
You can view subreports by selecting the hyperlinked payment instalment amounts. If the payment amount is 0, there will be no hyperlink.
You can use the hyperlinks to view both paid and unpaid amounts, as well as a monthly instalment details report. All of these go down to learner level detail.
The paid subreport contains information about payments. The unpaid subreport contains learning aim, fee and entitlement amounts.
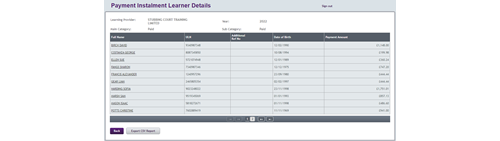
You can export both subreports in csv format. To do this, select Export CSV Report.
Learning aim start year view
- Select the relevant year from the Academic Year dropdown, then select Export CSV Report.
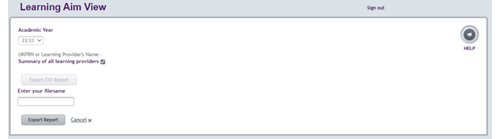
- Enter a filename and select Export Report.
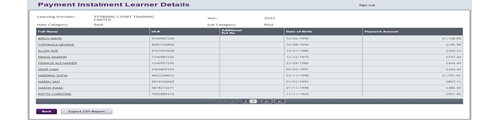
The report will show:
- all applications with an academic intent start date within that academic year
- all scheduled payments associated with the application
The data will cover up to 48 months.

Loan facility details
The Department for Education (DfE) sends us your loan facility amount every year. Once we have this information, we create a loan facility record for you.
The loan facility record contains the following fields (example for academic year 2025/26):
- contract end date
- loan facility start date: 01/08/2025
- loan facility end date: 31/07/2026
- loan facility allocation amount: £1000.00
- loan facility amount used: £0.00
- loan facility percentage used: 0%
- loan facility amount remaining: £1000.00
You'll need LP Financials Administrator access to view this information.
- Go to the Financials Home page and select the Loan Facility Details tab.

- Select the relevant year from the Academic Year dropdown, then select Display Details.

- This will open a read-only view showing the figures as they were at close of business the night before.

The Loan Facility Amount Used is calculated using all scheduled instalments. This includes scheduled instalments for learners whose course may have started in a previous academic year and who are still in learning.
It is updated by the overnight batch, considering all Change of Circumstance notifications submitted that day which reduce or increase this figure.
You can export the payment schedule and attendance report from the Learner Information page and filter on academic year only. This will show you the learners whose payments make up this figure.
Next, filter on scheduled payment date (column L) and select all dates between 1 August and 31 July for the academic year. Then, check the total in column N (payment amount).
For the two figures to match, you should run the report as early as possible in the morning, before new applications and Change of Circumstance notifications are processed that day.
Loan facility warning messages
Loan facility used = 80%
When you've used 80% of your loan facility for any academic year, you'll get a warning message. This will appear in the message section of the Learning Provider Portal Home page, as well as on the Loan Facility Details page.
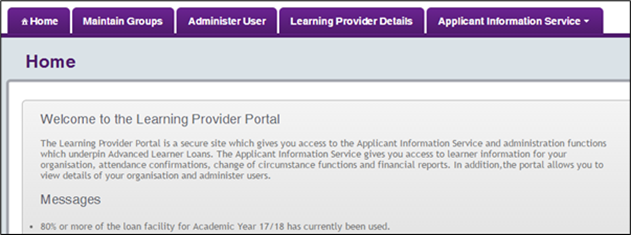
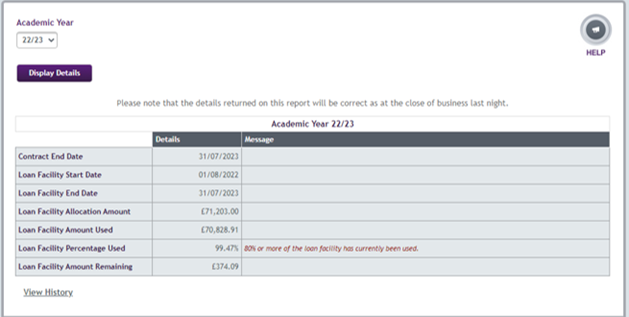
Loan facility used = 90%
When you've used 90% of your loan facility, your primary and secondary contacts will get a warning email.
Email subject: Learning Provider Portal – Advanced Learner Loan – Facility Used
Dear Colleague,
Important – Please Read...
90% or more of your Advanced Learner Loan Facility for Academic Year 2025/26 has currently been used. You may want to consider this when recruiting further learners.
This email is for information purposes only.
Yours sincerely
Student Loans Company
Please do not reply to this email. It has been automatically produced from an address which cannot accept incoming mail.
Loan facility used = 100%
When you've used 100% of your loan facility for any academic year, you'll get a warning message. This will show in the message section of the Learning Provider Portal Home page, as well as the Loan Facility Details page.
Your contract manager, primary and secondary contacts will also get a further email.
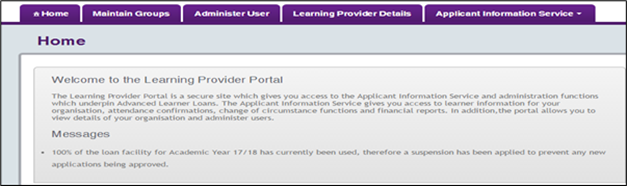
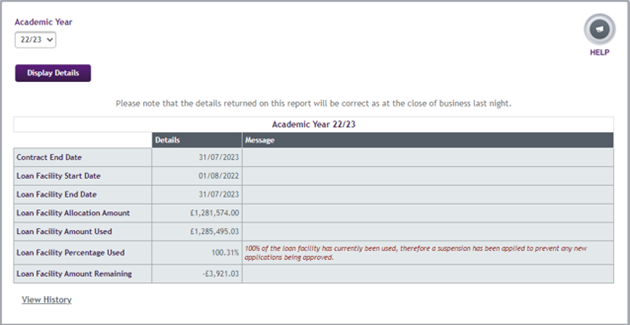
Once you've used 100% of your loan facility, we'll apply an automatic service restriction. This will prevent any new applications being approved for that academic year.
Any applications received before the date the restriction becomes effective will still be approved. This includes applications sitting at missing evidence or eligibility incomplete and auto-cancelled statuses.
Email subject: Learning Provider Portal – Advanced Learner Loan – Facility Used
Dear Colleague,
Important – Please Read...
100% of your Advanced Learner Loan Facility for Academic Year 2025/26 has currently been used, therefore a suspension has been applied to prevent any new applications being approved. Please ensure you do not recruit any further learners at this time.
If you require any further information, please contact your Provider Manager at the Department for Education (DfE).
Yours sincerely
Student Loans Company
Please do not reply to this email. It has been automatically produced from an address which cannot accept incoming mail.
Contract end date warning
If your contract end date is earlier than your loan facility end date, you'll get a warning message. This will show in the message section of the Learning Provider Portal Home page, as well as on the Loan Facility Details page.
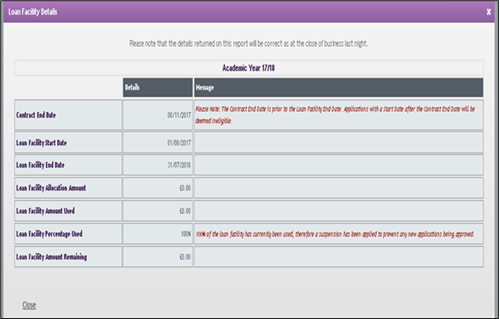
Payment instalment report (PIR)
The payment instalment report (PIR) shows a monthly breakdown of:
- loan instalments which have been paid
- loan instalments which are due to be paid
- loan instalments which cannot be paid
You'll need LP Financials Administrator access to view this report.
The payment instalment report shows data annually by academic year. The report runs from 1 August to 31 July.
Viewing the payment instalment report
- Hover over the Applicant Information Service tab to open the menu. Select Financials Home, then Payment Instalment Report.

- Select the Academic Year View tab or the Learning Aim Start Year View tab.

Payment instalment report: academic year view
Select the relevant academic year, then select Display Details. This page will default to the current academic year. The report is only available from academic year 2017/18 onwards.

Viewing the payment instalment report
The payment instalment report has 2 separate tables:
- approved for payment
- not approved for payment
The report will show the details as they were at the close of business the night before.
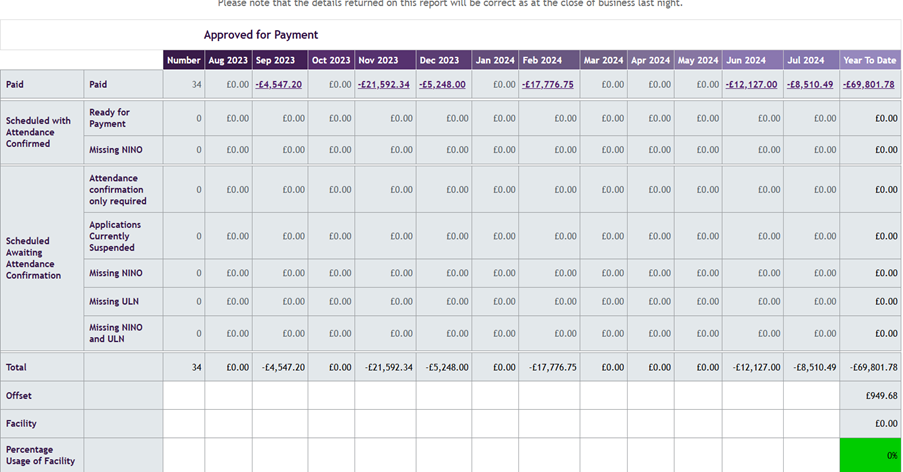
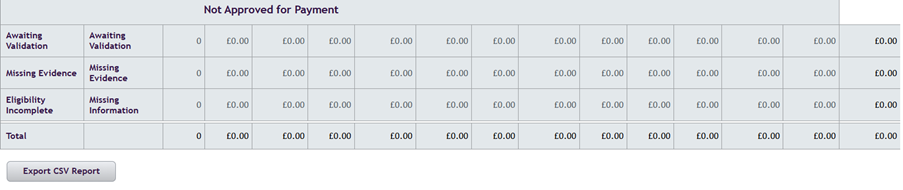
Approved for payment
The Approved for payment table has 3 main sections:
- paid
- scheduled with attendance confirmed
- scheduled awaiting attendance confirmation
The paid, scheduled with attendance confirmed and scheduled awaiting attendance confirmation figures include applications that are approved, suspended or withdrawn.
A further breakdown of the sections shows whether the application is currently suspended, has a missing ULN, National Insurance number or both.
The paid section is filled once the payment run begins and not on the actual payment date.
If you confirm a learner’s attendance with N (not in attendance) or C (not in attendance because their start has moved to a later date), the learner is removed from the Attendance Worklist and will show on the CoC Worklist.
However, the loan amount for these learners will still show under the Attendance confirmation only required subsection, until you submit the appropriate CoC.
The Approved for payment table contains 5 further sections:
- total
- offset
- facility
- percentage usage of facility
- number
The total row is the sum of all the instalments in the rows above.
The offset value is any money your organisation owes. It matches the offset in the Payment Instalment Report
The facility value is your loan facility value the Department for Education (DfE) has sent us for that academic year. For example, for academic year 2025/26 it will run from 1 August 2025 to 31 July 2026. This value matches that on the Loan Facility Details page.
The percentage usage of facility is the value taken from the Loan Facility Details page. If the percentage is no higher than 80%, the field will be green. If it is between 81% and 94%, the field will be amber. At 95% or over it will be red. These amounts will appear in the year to date (YTD) column.
The number column shows the total amount of applications included in that row.
Not approved for payment
The Not approved for payment table has 3 sections:
- Awaiting Validation
- Missing Evidence
- Eligibility Incomplete
There are hyperlinks in each section. These take you to the' Non-Payment Instalment Learner Details' page.
'Awaiting Validation' shows applications under review to confirm the learner has provided all information and evidence. This includes applications that are going through Home Office Document Share (HODS), Identity Passport Service (IPS) and Long Residency processes.
You should inform learners that we may need additional residency information following the initial Home Office check. This check may take longer during peak processing times at the Home Office, which can cause delays to our assessment.
'Missing Evidence' shows applications that are on hold until the learner provides further evidence.
'Eligibility Incomplete' shows applications with information or evidence missing.
Exporting a csv report
- Select Export CSV Report.
- Enter a filename.
- Select Export Report.
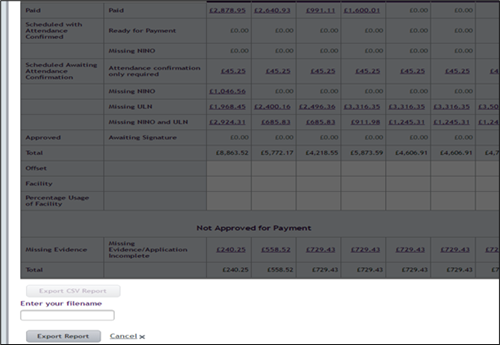
Attendance
Attendance
Attendance confirmation is how you let us know that a learner is engaged on their learning aim.
You'll first need to confirm attendance 2 weeks after the start of the learning aim. This is called the initial liability point.
After this, you'll need to confirm the learner’s ongoing attendance quarterly, by the first day of the month, throughout the learning aim.
The quarterly attendance confirmation points are fixed as 1 August, 1 November, 1 February and 1 May.
We'll assume attendance (and therefore loan liability) for the first of the month in the months between these fixed points and will make payments to you.
If a learner withdraws from their learning aim, you should submit a Withdrawal or Suspension (CoC) as soon as possible to avoid overpayments.
The learner’s loan application should be in approved status. You will not be able to confirm attendance for a learner before their application has been approved.
Initial attendance confirmation
2 weeks after the start of the learning aim.
Subsequent (quarterly) attendance confirmation
Once a quarter, attendance confirmation points are fixed as 1 August, 1 November, 1 February and 1 May.
As an example, if a learner starts a 10-month learning aim on 1 August 2020, the attendance points will be:
- initial confirmation 2 weeks after learning aim start – 15 August
- second quarterly attendance check – 1 November
- third quarterly attendance check – 1 February
- fourth quarterly attendance check – 1 May
Aug Initial attendance confirmation needed
Sept Assumed attendance
Oct Assumed attendance
Nov Quarterly attendance confirmation needed
Dec Assumed attendance
Jan Assumed attendance
Feb Quarterly attendance confirmation needed
March Assumed attendance
April Assumed attendance
May Quarterly attendance confirmation needed
The same process will apply to learning aims that start in any month of the year. As an example, if a learner starts a 10-month learning aim on 2 January 2021, the attendance points will be:
- initial confirmation 2 weeks after learning aim start – 16 January
- second quarterly attendance check – 1 February
- third quarterly attendance check – 1 May
- fourth quarterly attendance check – 1 August
Jan Initial attendance confirmation needed
Feb Quarterly attendance confirmation needed
March Assumed attendance
April Assumed attendance
May Quarterly attendance confirmation needed
June Assumed attendance
July Assumed attendance
Aug Quarterly attendance confirmation needed
Sept Assumed attendance
Oct Assumed attendance
If a learning aim does not cover all 4 quarterly attendance check points, we will only need attendance confirmation for the period that falls within these points.
For example, if a learner starts a 6-month learning aim on 1 August 2020, you will only need to submit the initial and second quarterly attendance confirmation. The attendance points will be:
- initial confirmation 2 weeks after learning aim start – 15 August
- second quarterly attendance check – 1 November
Aug Initial confirmation needed
Sept Assumed attendance
Oct Assumed attendance
Nov Quarterly attendance confirmation needed
Dec Assumed attendance
Jan Assumed attendance
Feb N/A
March N/A
April N/A
May N/A
The attendance confirmation will trigger payment of the fee loan to you. We cannot make the payment without an attendance confirmation.
There are 3 ways in which you can confirm attendance for your learners.
- using the Attendance Worklist page on the Learning Provider Portal
- for an individual learner, using the Detailed Learner Information page on the Learning Provider Porta
- using a bulk import file in xml or csv format
You can combine these methods for different learners or different attendance confirmations through the year.
The Unique Learner Number (ULN) is a mandatory field. You'll need to enter this before you can confirm attendance.
If you have not entered the ULN, the learner will not appear on the Attendance Worklist and the attendance dropdown will not be available on the Detailed Learner Information page. See Field Updates for more information.
User roles that give access to attendance functions
You'll need to have LP Attendance Administrator access to see the Attendance Home page, view the attendance confirmation worklist and confirm a learner’s attendance.
You can find more information on user roles in the Learning Provider user roles chapter of this guide.
Attendance Worklist
You can access the Attendance Worklist from the Applicant Information Service menu on the portal Home page. Select the Attendance Home link to go to the attendance functions.
If you have any outstanding attendance confirmations, you'll see a message on the Attendance Home page.
Select the Attendance Worklist link to:
- search and view records
- confirm attendance for both individual and multiple learners
- export the Attendance Worklist in xml format
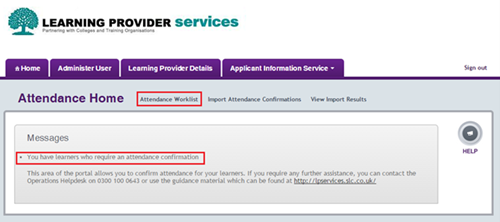
If we need an attendance confirmation, the learner will automatically appear on this worklist. There is no need for you to manually keep track of when to submit confirmations.
You can use the search page to look for all outstanding attendance confirmations or a specific subset.
Attendance Status
You can use this field to search by attendance status. The statuses are:
- all (the system defaults to this status) – this will return all learners with an outstanding attendance confirmation
- unconfirmed – this will return learners whose attendance status has not yet been submitted
- saved – this will return learners whose attendance status has been added to the record and saved, but not yet submitted
Learning Aims
This field lets you search for learners on a particular learning aim.
Start Date From
Use this with the Start Date To field to search for learners with start dates in a certain range.
Start Date To
Use this with the Start Date From field to search for learners with start dates in a certain range.
End Date From
Use this with the End Date To field to search for learners with end dates in a certain range.
End Date To
Use this with the End Date From field to search for learners with end dates in a certain range.
Course Location
If you've added your own course location code (see Field updates for more information), you can search for all outstanding attendance confirmations that have this code.
Course Trainer
If you have added your own course trainer code (see Field updates for more information), you can search for all outstanding attendance confirmations that have this code.
Number of Records to Display per Page
You can use the dropdown to choose how many records you want to see per page. The options are 25, 50, 100 and 200.
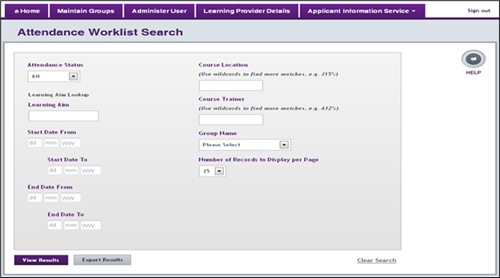
The Attendance Status field defaults to All. Select the appropriate search criteria, then select either View Results or Export Results.
If you select View Results, the search results will appear on screen.
The records will be displayed in one of 3 colours:
- grey – learners whose attendance status has not yet been entered
- blue – learners who have had an attendance status assigned to them, but the record has been saved and not submitted
- orange – learners who have more than one outstanding attendance confirmation, for example the initial attendance confirmation and the next quarterly attendance confirmation
Saved records
You can select an attendance confirmation status for one or more learners and submit it from the worklist. However, there may be times when you want to save the Attendance Confirmation without submitting it.
In this case, you should select Save. This will save the relevant attendance code for the learner, but the learner will stay on the worklist and payment will not be released. The record will be highlighted in blue.
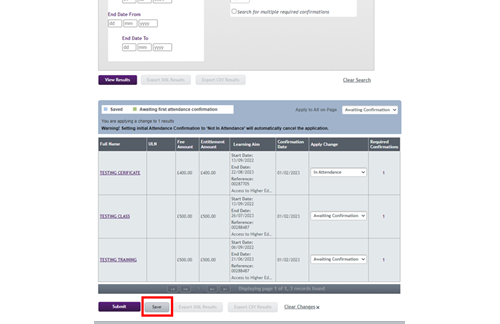
More than one outstanding confirmation
If there is more than one outstanding confirmation, the learner will be highlighted in orange on the Attendance Worklist.
You'll only be able to submit the earliest outstanding confirmation from the worklist search results.
To confirm later outstanding confirmations, you'll need to run another Attendance Worklist search. This new search will then show the next outstanding confirmation.
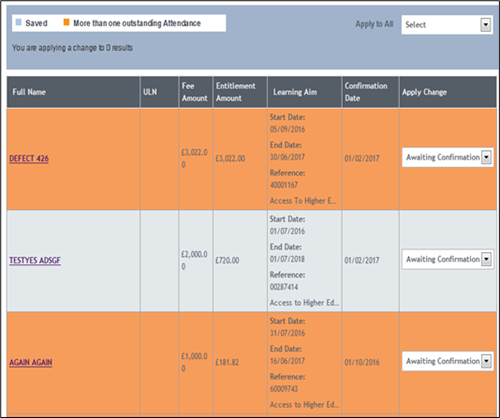
Worklist attendance confirmation
You can confirm attendance in 3 ways from the Attendance Worklist.
- Select a value from the dropdown in in the Apply Change column. This will apply to the individual learner.
- Select a value from the Apply to All dropdown. This will apply to all learner records.
- Select a learner’s name to go to the Detailed Learner Information page and confirm attendance from there. This will apply to the individual learner.
The worklist fields are:
Full Name
The learner’s full name.
ULN
The learner’s Unique Learner Number (ULN).
Fee Amount
The learner’s fee amount.
Entitlement Amount
The amount of loan to be paid.
Learning Aim
The learner’s learning aim start date, end date, reference number and name.
Confirmation Date
The date of the attendance confirmation request.
Apply Change
A dropdown with attendance statuses.
Individual learner confirmation
To confirm attendance for an individual learner, select the confirmation status from the dropdown in the Apply Change Column.
You can do this for one, multiple, or all learners shown on the page. Once you've selected the statuses, select Submit.
You can use the following confirmation status options:
Awaiting Confirmation
No attendance status has been entered for this learner.
In Attendance
The learner is in attendance and engaged on the learning aim.
Not in Attendance
The learner is not in attendance and no longer engaged in their learning aim.
If you submit this status at initial attendance confirmation, the application will be cancelled automatically.
If you submit this status at a subsequent quarterly attendance confirmation, the system will create a CoC reminder in your CoC worklist. You should submit a Withdrawal or Suspension CoC.
You should not submit an attendance confirmation if the learner is not in attendance due to early completion. You should instead submit an Early Completion CoC. This will update the learner’s record and remove them from the Attendance Worklist.
Change Start Date
The learner is or will be in attendance, but their learning aim start date has changed. You can only use this status for the initial attendance confirmation.
If you submit this status, the system will create a CoC reminder in your CoC Worklist. You should create a Change of Learning Aim CoC. The learner will then reappear on the worklist at the appropriate time.
Multiple learner confirmation
You can use the Apply to All dropdown to apply the selected attendance status to all learners on the page.
This is a quick way to make updates if all or most learners on the page have the same attendance status.
If you have made changes in error, select Clear Changes at the bottom of the Attendance Worklist.
Detailed Learner Information page confirmation
You can also confirm attendance in the Current Payment Schedule and Attendance section of the Detailed Learner Information page.
You can get to this page by selecting the learner’s name on the Attendance Worklist or from the Learner Information page.
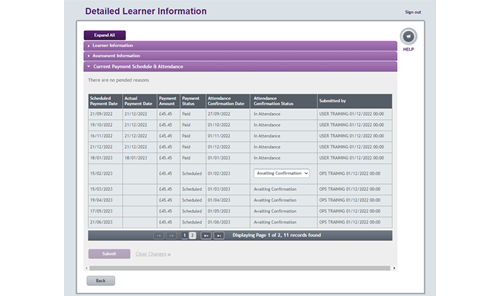
The Current Payment Schedule and Attendance section of the page shows the following information.
Scheduled Payment Date
The date when the instalment is scheduled for payment.
Actual Payment Date
The date when we made the payment to you.
Payment Amount
The amount we paid or will pay you.
Payment Status
The status of the payment can be:
- scheduled – it is due to be made
- in progress – it been triggered and is in the banking system
- paid – it has been made
- failed – it has failed (please contact our support desk for more information)
Attendance Confirmation Date
The date by which you need to confirm the learner’s attendance.
Attendance Confirmation Status
The attendance confirmation status can be:
- in attendance
- not in attendance
- change start date
Submitted By
The details of the user who submitted the attendance confirmation. Until an attendance confirmation has been submitted, this field will show the user who last updated the record.
After the learner’s application has been approved, the full list of payments will show, along with the attendance confirmation status that is linked to each payment.
If you need to submit a confirmation, you'll see a dropdown with attendance confirmation statuses. To confirm attendance, select the appropriate status from the dropdown.
The dropdown will only be available when we need you to confirm attendance.
You will not be able to submit a positive or negative attendance confirmation in the months of assumed attendance, between the 4 attendance confirmation points. We will assume that the learner is in attendance unless you submit a Withdrawal CoC.
If you submit a Withdrawal CoC, all future payment instalments will be deleted from this page.
Applications with no attendance confirmation for 12 months will be automatically withdrawn.
More than one outstanding confirmation
If there is more than one outstanding confirmation, you can submit all these from the Detailed Learner Information page. However, you should submit each confirmation individually, starting with the earliest.
For example, if the initial and November confirmations are outstanding, you should first select the status for the initial confirmation and select Submit. When the page refreshes, you can select the status for the November confirmation.
Suspension and Resumption CoCs
If a learner suspends their learning aim, you should submit a Suspension CoC.
Applications suspended for 12 months will be automatically withdrawn.
The effective date of the withdrawal will be the same as the effective date of the original Suspension CoC.
When the learner resumes their learning aim, you should submit a Resumption CoC.
We will ask you to confirm the learner’s attendance in the month that they resume, even if this is not the time of the normal quarterly attendance check.
The learner will appear on your attendance worklist when we need this confirmation.
Attendance import file
You can also confirm attendance by importing an attendance confirmation file into the Learning Provider Portal. The file needs to be in xml or csv format.
You can export the attendance worklist to create your attendance confirmation file, update it and import it back into the portal.
Attendance worklist export
You can export the attendance worklist from the search results page.
- Select Export Results to open the Export section.
- Enter a filename in the Export File Name field and select Export Results.
- Follow the system prompts to select where you want to save the exported file.
Attendance import
You can confirm attendance of your learners in bulk by importing an xml or csv file with the attendance data.
- Go to the Attendance Home page and select Import Attendance Confirmations.

- Select Choose File and browse your system for the file you want to import. Once you have found the file, select it and then select Submit.
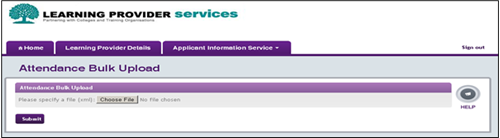
The attendance import file should contain the appropriate attendance codes.
You can submit 3 types of confirmation:
- Y – the learner is in attendance, approve payment for release
- N – the learner is not in attendance
- C – the learner is not in attendance because their start date has moved to a later date
For full details of the format of the attendance import file, see 'Schema Definition – ALL Attendance Confirmation Import Schema'. If you need a copy please email lp_services@slc.co.uk.
View import results
Once you have submitted the attendance file, you should check that it has uploaded successfully.
Go to the Attendance Home page and select View Import Results.
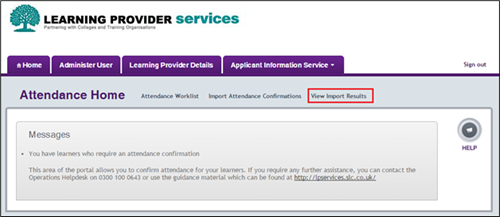
This will take you to a search page where you can search for files within a certain date range or with a particular import status.

The file import status could be one of the following:
Awaiting Processing
The file is queued, waiting to be processed.
Being Processed
The file is currently being processed.
Processed with Error(s)
The file has been processed, but contains errors.
Successfully Processed
The file has been successfully processed and attendance confirmations have been loaded.
System Error – File Not Processed
A system error has resulted in the file not being processed and you should resubmit it.
After completing the search, you will see a list of files that meet your search criteria.
File format validation will check that the file and the fields are in the expected format. Business rule validation will check individual records within the file. The system will tell you if there are any errors at file or individual record level.
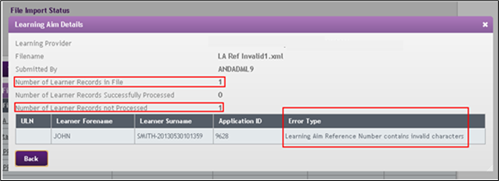
Incorrectly submitted attendance confirmations
Attendance confirmations will trigger a payment to you and loan liability for the learner. You should therefore always ensure that your attendance confirmations are accurate.
However, if you have used the wrong attendance status by mistake, you should follow the process described here to correct it.
The list below details the incorrect status and what you need to do to rectify it.
Not in attendance instead of In attendance – initial
If you submit a status of Not in attendance for the initial confirmation, the application will be automatically cancelled.
If this is incorrect, you should submit a Reinstate CoC. Once this is processed, the learner will reappear on your attendance worklist and you can submit an In attendance confirmation.
We will then make the loan payment to you in the next payment run.
Not in attendance instead of In attendance – quarterly
If you submit a status of Not in attendance for a subsequent attendance confirmation, you can still change this. Go to the Current Payment Schedule and Attendance section of the Detailed Learner Information page and select In attendance.
We will then make the loan payment to you in the next payment run.
In attendance instead of Not in attendance – before payment
The payment run will start at close of business on the Thursday before the Wednesday payment is scheduled.
If you incorrectly submit a status of In attendance before the payment run starts, you can still change this.
Go to the Current Payment Schedule and Attendance section of the Detailed Learner Information page and select Not in attendance.
The system will only lock the attendance status once the payment run begins.
In attendance instead of Not in attendance – after payment
If you have incorrectly submitted a status of In attendance and the payment run has already started or we have already made the payment, you should submit a Withdrawal or Suspension CoC. We will recover the payment from the next payment we make to you.
If you would like to discuss any other scenarios, please contact our Partners Support Desk.
Attendance Management guidance
Further Education Providers - Attendance Management
- Every Further Education Provider (provider) should have a published, auditable attendance policy to satisfy its own governance processes. A provider must not claim funding from the Student Loans Company (SLC) for learners who are not adhering to a provider’s attendance policy. This relates to various provisions in respective student support regulations and any other applicable regulations1, which means payment of student funding is conditional on confirmation by a provider that a learner is attending and undertaking their course.
- This document makes clear what attendance means for the purpose of entitlement to student funding. A provider is responsible for compliance with this for all its courses.
- Attendance means active participation in a course by a learner, including, but not limited to, teaching face-to-face, online/distance learning or blended study, in line with a provider’s published attendance policy. A provider should communicate its policy to a learner and have an auditable process in place to support the action it may take when a learner does not meet attendance expectations.
- Providers have flexibility to ensure every learner engages with a course, and that the learner and/or the course may require greater or less attendance than another due to circumstances or content. Every provider must have a published attendance policy.
- A provider should communicate to a learner what its attendance policy is, considering the demands of the course and any personal circumstances of learners who may require specific study arrangements, for example, but not exclusively, due to a disability. If a learner’s participation in a course does not meet its expectations, a provider should act promptly to inform the SLC that it has withdrawn a learner as per a provider’s service agreement with the SLC. The necessity to do so, to reduce the risk to public funding, may arise after a provider exhausts its own procedures to help a learner remain on their course.
- A provider should retain a sufficient, auditable record in a format that enables it to determine if a learner is attending their course. The Department for Education reserves the right to ensure there is action if it is considered a provider is not implementing an effective attendance policy.
(1) The Further Education Loans Regulations 2012, Part 5, para 19 (b) (c) and para 22 (3) (4) - https://www.legislation.gov.uk/uksi/2012/1818/part/5
Loan payments
Payment
We will make loan payments after you submit the initial attendance confirmation. We cannot make payments without a confirmation of attendance.
We will schedule payments on a monthly basis throughout the length of the learner’s learning aim.
We will make payments in equal instalments where possible. The last instalment may be slightly different depending on the loan amount.
The payment schedule starts from the initial liability point. This is 2 weeks after the learning aim start date.
For example, if a learner starts a 10-month learning aim on 1 August and the learning aim fee is £1000, the attendance confirmation and payment schedule will be as follows:
August - Confirmed - £100
September - Assumed - £100
October - Assumed - £100
November - Confirmed - £100
December - Assumed - £100
January - Assumed - £100
February - Confirmed - £100
March - Assumed - £100
April - Assumed - £100
May - Confirmed - £100
We will make payments monthly, on the third Wednesday of the month.
Circumstances affecting payment
Early completion
If a learner completes their learning aim early and you submit an Early Completion CoC, we will pay all of the outstanding loan the month after the early completion date.
Extending the learning aim end date
If you submit a Change of Learning Aim CoC which extends the learner’s end date, we will update the payment schedule to match the new end date.
Overpayments
In some cases, you may receive an overpayment. For example, this can happen if you do not submit a Withdrawal or Suspension CoC until after we have made a payment.
We will offset any overpayments against the next payment we make to you.
Unique Learner Reference Number
The Unique Learner Reference Number (ULN) is a mandatory field and you must enter this for all your learners.
Without a ULN, the learner will not be added to the attendance worklist and you will not be able to confirm their attendance.
This means we will not be able to make their loan payments.
Loan reduction
A learner will not be able to reduce their loan to less than what we have already paid you.
However, you can submit a CoC to reduce a learner’s fee and loan if appropriate.
Late loan application
A learner can apply for a loan at any point until the end of their learning aim.
If a learner applies late, we will still schedule the loan across the entire length of the learning aim. However, the first payment will include the payments that we would have made if the application had been in place from the start of the learning aim.
For example, if a learner starts a 10-month learning aim with a tuition fee of £1000 on 1 August, but does not apply for a loan until October, the attendance confirmation and payment schedule will be as follows:
August – No attendance confirmation – No payment
September – No attendance confirmation – No payment
October – Confirmed from aim start – £300
November – Confirmed – £100
December – Assumed – £100
January – Assumed – £100
February – Confirmed – £100
March – Assumed – £100
April – Assumed – £100
May – Confirmed – £100
Interest will accrue from the point we make a payment to you.
Monthly payment drawdown cutoff point
We will make payments to you monthly, on the third Wednesday of the month, following the initial attendance confirmation.
You will need to confirm attendance by close of business on the Thursday before the Wednesday payment. This leaves us enough time to calculate the payments.
This is what we call the payment drawdown point. If you confirm attendance for any learners after this cutoff point, they will be included in the following month’s payment run.
You can find more information in our drawdown and payment calendar.
National Insurance numbers
We cannot make payment of a loan to you if we do not have a verified National Insurance number for the learner.
The learner should provide this during the application process, but we will also try to get it from the Department for Work and Pensions (DWP).
You can check whether you have any learners without a verified National Insurance number by using the filter on the Learning Information Search page.
You can confirm the attendance of a learner who has not submitted a National Insurance number, but the payment will be blocked.
EU learners do not need to provide a National Insurance number.
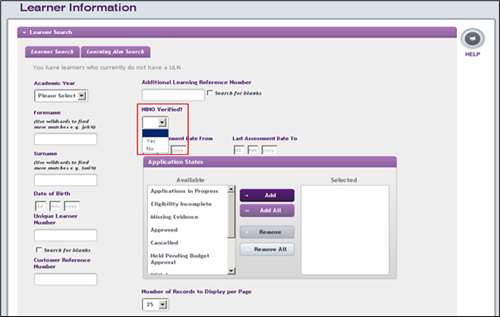
Payment schedule
When a learner’s application is approved, we create a payment schedule for the learner. Payments are scheduled on a flat monthly profile, based on the initial liability point and the learning aim end date.
You can view a learner’s payment schedule in the Current Payment Schedule and Attendance section of the Detailed Learner Information page.
The schedule will show the following information:
Scheduled Payment Date
The date when the instalment is scheduled to be paid.
Actual Payment Date
The date when we made the payment to you.
Payment Amount
The instalment amount that we will pay you.
Payment Status
The status of the payment:
- scheduled
- in progress
- paid
- failed
Attendance Confirmation Date
The date by which you need to confirm the learner’s attendance.
Attendance Confirmation Status
The attendance confirmation status:
- awaiting confirmation
- in attendance
- not in attendance
- change start date
Submitted By
The details of the user who submitted the attendance confirmation.
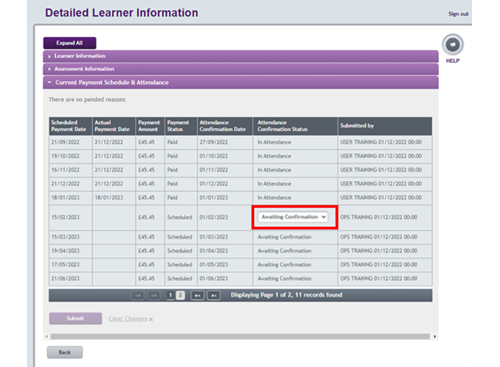
Remittance report
Remittance report
You need to have LP Financial Administrator access to view and export remittance reports.
- Go to the Applicant Information Service and select Financials Home.
- On the Financials Home page, select Remittance Report.

The remittance report has information on:
- payments that are in progress
- payments that have been made
- any payments that have been recovered
You can view this information on screen or export it as an xml or csv file.

The report has the following information.
Scheduled Payment Date
The date when the instalment is scheduled to be paid.
Actual Payment Date
The date when we made the payment to you.
Payment Status
The status of the payment:
- scheduled
- in progress
- paid
- failed
Positive Payments
Positive payments are created from reassessments which change payment amounts and can be recovered in that month’s payment run.
Negative Payments
This is the amount we will recover due to an outstanding offset recovery amount. This is caused by reassessments in previous months.
You will be able to find this amount in a previous remittance file.
Offset amounts are negative amounts which are clawed back historically due to overpayments made, and which cannot be recovered by payments you are due in that month.
Payment Amount
This is the total of the individual payments and recoveries on the remittance file for that month.
This will not necessarily be the amount we deposit in your bank account. The payment you receive will be affected by any outstanding recovery amounts shown on previous remittance files.
Recovery Amount
This is the amount we will recover due to an outstanding offset recovery amount. This is caused by reassessments in previous months.
You will be able to find this amount in a previous remittance file.
Payment to Bank
This is the total amount we will pay you in that payment run.
Export
Use this checkbox to select the file you want to export.

Payment scenario Month X:
- you have no positive payments
- you have a £100 recovery amount
- the bank payment amount will be £0
Payment amount: £0, Recovery amount: £0, Actual payment to your bank account: £100
Payment scenario Month Y:
- you have a £500 positive payment
- you have a £0 recovery amount
- the bank payment amount will be £400, made up of £500 month Y payment minus outstanding recovery from month X
Payment amount: £500
Recovery amount: £0
Actual payment to your bank account:£400
Payment scenario Month Z:
- you have a £500 positive payment
- you have a £100 recovery amount
- The bank payment amount will be £400, made up of £500 month Z payment minus £100 month Z recovery amount
Payment amount: £400 (the payment amount is the sum of positive payments and recoveries for that month)
Recovery amount: £100
Actual payment to your bank account: £400
Information on most recent payments will appear first. You can navigate through the pages of payments by selecting the page numbers at the bottom.
To view details of the individual learners who make up the payment file, select the Actual Payment Date hyperlink. This will open a window showing the remittance report detail.
This window will show a summary of the selected payment and a learner level breakdown for each payment.
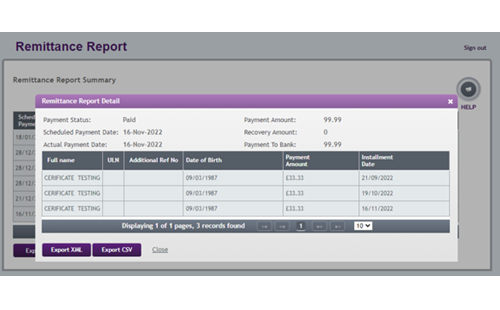
The remittance report detail will also show any recoveries made as the result of CoCs.
These recovery amounts will show as a minus on the payment amount for the individual learner, as well as a total next to the recovery amount at the top of the remittance report detail.
The Instalment Date field will show the date of the individual learner payment.
If you are receiving more than one month’s payment for a learner on one payment date, this field will show each instalment as a separate record with each instalment date shown for each month.
If you want to export this information in xml or csv format, select Export xml or Export csv.
Remittance export
You can export remittance files in xml or csv format. To export remittance reports, check the checkboxes next to the files that you want to export.
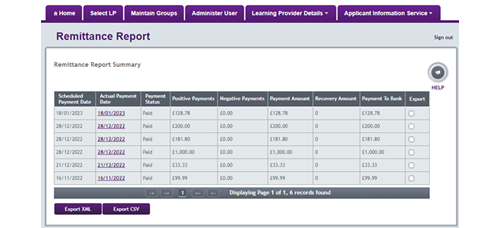
The export file contains the following information.
Payment identifier
The unique identifier for a payment.
Payment date
The date the payment was made.
Payment Amount
The total of the individual payment and recoveries on the remittance file.
Offset Recovered
Offset amounts are negative amounts which are clawed back historically due to overpayments made, and which cannot be recovered by payments you are due in that month.
Payment Status
The status of the payment:
- in progress
- paid
- failed
Learner Surname
The surname of the learner.
Learner Forename
The forename of the learner.
Date of Birth
The learner’s date of birth.
ULN
The learner’s Unique Learner Number (ULN).
Additional Learner Reference Number (if used)
The learner’s Additional Learner Reference Number.
Payment Amount
The total paid to you on behalf of this learner.
Application ID
The ID associated with the application.
Course Trainer
This is optional information that LP Administrators can edit.
Course Location
This is optional information that LP Administrators can edit.
Provider Group
This is optional information that you can edit.
Instalment Date
The date the instalment was due to be paid.
Instalment Amount
The amount that we paid or recovered for this instalment date.
For full details of the format of this file, please see 'Schema Definition – ALL Payments Export Schema'. If you need a copy please email lp_services@slc.co.uk.
User access controls
User access controls overview
User access controls allow you to create groups of learners and assign these groups to specific users. After creating a group, you can link it to a user. A user who you've assigned to a group can sign into the portal, but they will only be able to view the learners within that assigned group. You should not assign users to to an individual group if they need full visibility of all applications.
You can also manage the access rights for each group, giving users tailored levels of access within the portal. In this guide, we refer to LP Portal users from Primary Learning Providers as ‘Primary Learning Provider users’. We'll refer to users who you've assigned a group as ‘Learning Provider group users’.
Creating a user
Any portal user with User Administrator access can create and maintain other user accounts.
You must create a user before you can assign them to a group.
There are 2 points to remember when you create a user.
- If you give a group user the User Administrator role, this user will also be able to administer all other user accounts at your organisation. This is not restricted to the group.
- A newly created user will have access to all learners assigned to your organisation until you assign the user to at least one group.
Creating and maintaining groups
You can create and maintain groups on the Maintain Groups tab of the Learning Provider Portal.
Users with LP User Administrator access can:
- create groups
- maintain groups
- make groups inactive
- Select the Maintain Groups dropdown within the Maintenance tab. This is where you can see all existing groups.
- To add a new group, select Create group. This will open a popup where you can enter the details of the group. Complete these as prompted and select the users you want to assign to this group.
- To update an existing group, select the group from the list. This will open a popup where you can change the group name or the users assigned to the group.
- Once you have made your updates, select Save.
- If you want to make a group inactive, select it and uncheck the Active checkbox.
Assigning users to groups
Once you have created a new group, you can add users to it. You can also add or remove users from existing groups.
You will need LP User Administrator access to do this.
- Go to the Maintain Groups dropdown within the Maintenance tab, find the group you want to update and select Edit. This will open a popup that shows all active users at your organisation.
- Find the user you want to add and select Add. The user will now appear in the Users assigned to group section and disappear from the group users subsection.
- Select Save to save your updates to the group.
If you want to remove a user from a group, find them in the list of group users and select Remove.
Adding learner applications to groups
You can assign any application to any active group, but you can only assign each application to one group at a time. You will be assigning applications rather than learners, so if a learner has more than one application, you will need to assign each of these separately.
There are 2 ways to assign applications to groups:
- individually – from the Detailed Learner Information page
- for more than one application – from the Learner Information Search results page, by using the Select All option
You will need LP Administrator access to assign learner applications to groups.
Adding an individual learner application to a group
You can assign a learner to a group on the Detailed Learner Information page.
The Learner Information section on this page includes a Group Name field. This shows the name of the group linked to the application. If the application is not linked to any group, the field will be blank.
If the application belongs to a group that has become inactive, you will see a message about this above the Group Name field.
The Group Name field has 2 actions: Assign Group and Remove Group.
If you do not have any groups created, the Assign Group option will not be enabled.
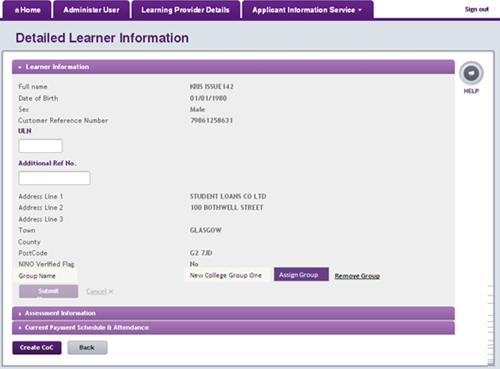
- Select Assign Group. This will open a popup with a list of all active groups. Find the group you want to add and select its radio button.
You can only assign an application to one group at a time, so you will only be able to select one group.
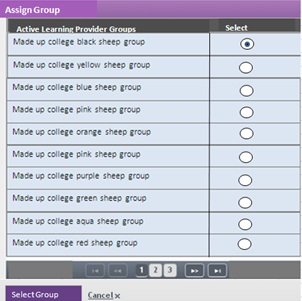
- Select Select Group. This will close the popup and take you back to the Learner Information section. The new group will now show in the Group Name field.
Adding more than one application to a group
Users with LP Administrator access can assign multiple learner applications to a group.
- Go to the Learner Information page and search for learners. You can use the results from any relevant search.
- Once you have your search results, select Assign Group. This will open a popup with a list of all your active groups.
- Find the group you want to add and select its radio button.
Removing a learner application from a group
You can only remove a learner’s application from a group on the Detailed Learner Information page.
The Group Name field on this page has 2 actions: Assign Group and Remove Group.
Select Remove Group to remove the learner’s application from the assigned group.
Group users and viewing learner information
Group users who have LP Administrator or LP Advisor access will be able to see the Learner Information Home section of the portal.
Group users with the appropriate role can perform the following actions for learners assigned to their groups:
- import ULNs
- administer CoCs
- view CoC reports
- import CoCs by uploading an xml file
- view, amend and submit attendance confirmations
- import attendance confirmations by uploading an xml file
All group users with the appropriate roles will have access to the Reports Tab section of the portal. Unlike other areas of the portal, the financial area is not restricted to group users.
This means that Finance Administrators who are group users will have access to the same data as Finance Administrators who are primary users. They will be able to see the data for all learners under your organisation, not just learners in their groups.
When you submit a Transfer Learning Provider CoC, the system will remove any groups linked to the application. This means that your users who are assigned to that group will lose access to the application information.
Further support
Further support
Partners Support Desk
Our Partners Support Desk will help you with any questions about our systems or operational issues.
You can contact the support desk once you have access to the system. If your question is about initial system setup, please contact your FE account manager instead.
FE account managers
Your FE account manager can help with initial setup queries. They can also help with any day to day operational questions about individual learners, application processing, payments and system issues.
If you are not sure who your account manager is, please email us at lpservices@slc.co.uk.
Data retention
Data retention
As part of our commitment to comply with the Data Protection Act 2018 we no longer retain information on our systems which we have no requirement for.
This currently includes deleting applications and customer information where:
- no payment has ever been made
- agreed retention triggers and periods have passed
Once the retention period has expired, we will remove applications which meet this criteria from our systems.
In exceptional circumstances we will retain applications for longer such as cases of fraud.
|
Application Approved |
Retention Figure |
Retention Period |
|
No |
End date of entire course |
6 months |
|
No (ineligible) |
End date of entire course |
12 months |
|
Yes |
End date of the entire course and no payments made |
12 months |