Version 4 - Last Updated: 31 Jul 2025
Field updates by bulk import
Adding ULNs by bulk import
If you have LP Administrator access, you can import ULNs for multiple learners using a bulk import file. This file must be in xml or csv format. For example, you can bulk upload attendance confirmations and Change of Circumstance notifications (CoCs).
If you are using a csv file, the report you want to import should be in the following format.
|
Header number |
Header name |
Example |
|
Header 1 |
learnerSurname |
Smith |
|
Header 2 |
learnerForename |
John |
|
Header 3 |
learnerDateOfBirth |
1984-05-10 |
|
Header 4 |
customerReferenceNumber |
12345678912 |
|
Header 5 |
uniqueLearnerReferenceNumber |
5412541444 |
We recommend you export the learner information from the Learning Provider Portal first, using the csv format. You can then update the exported file (for example remove additional columns) and save it to your own system. This will give you a file to work with that is in the correct format and has the necessary information.
When you open a csv file in Excel, Excel will try to remove zeroes from the start of numbers.
One way to prevent this is to import the csv file in a specific way.
- Open a blank Excel sheet.
- Select all cells (CTRL+a) and format them as text (right click and select Format cells).
- Open your csv file in Notepad. An easy way to do this is to drag the file into an open Notepad window.
- Copy all the content of the csv file and paste it into the first cell in Excel. Notice that a Paste options icon appears somewhere on screen.
- Select the small arrow next to that icon, then select Use text import wizard. This will open a wizard.
- Make sure Delimited is selected, then select Next.
- Select Comma and deselect Space in the delimiters area. Then select Next.
- You'll now need to define how to treat each column. We do not want Excel to change anything, so we'll define them all as text. Select the first column in the sheet, scroll sideways all the way to the right and shift+select the last column. In Column data format, select Text.
- Select Finish.
Follow the steps below to add ULNs in bulk.
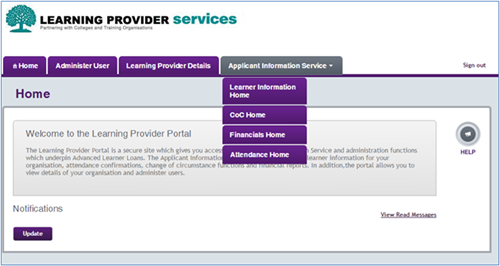
- Sign into the Learning Provider Portal.
- On the portal Home page hover over the Applicant Information Service tab to open the menu, then select Learner Information Home.
3. On the Learner Information Home page, open the Import menu.
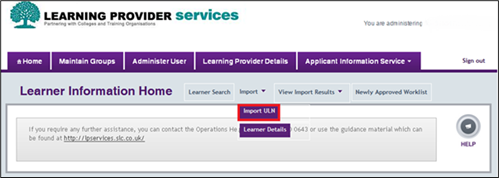
4. Select Import ULN. This will open the ULN Bulk Upload page.
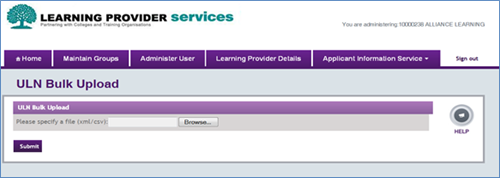
5. Select Browse and follow the on-screen prompts to choose the ULN file you want to import.
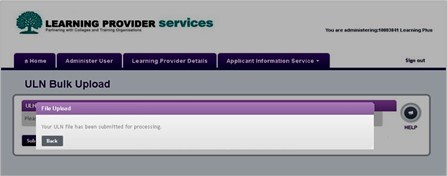
6. When you have selected the file, select Submit to upload it. The system will then confirm that the ULN file has been submitted for processing.
When you submit the file, the system will check that the file is in the correct format. The format must be the same as detailed in the schema. All the mandatory fields must be filled. The system will also check that the file follows the correct business rules.
The system will process each ULN as in individual record. It'll then show the validation results to confirm which records passed and which failed validation. See Viewing ULN bulk import results for more information.
Print this chapter